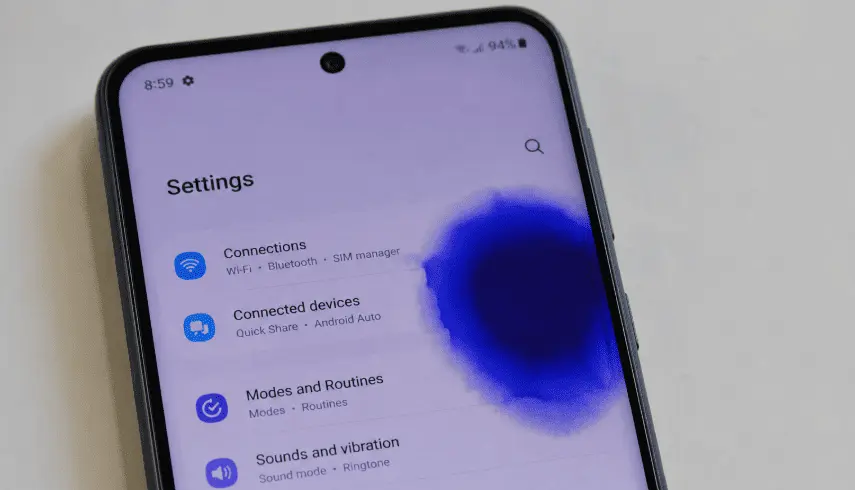
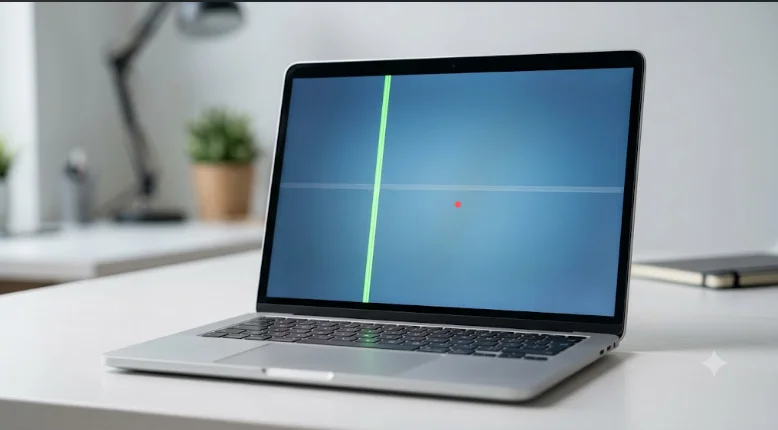
A dead pixel line on a laptop screen can be frustrating. Whether it runs vertically or horizontally, that distracting line can interrupt videos, cover important parts of documents, and make everyday tasks harder. But before you assume your laptop screen is permanently damaged, know this: not every screen line means you need a costly replacement.
Some laptop screen lines are caused by temporary software issues, stuck pixels, or loose connections that can be fixed with simple troubleshooting. Others are signs of a damaged display panel or ribbon cable that may require professional repair.
If you are experiencing other display glitches alongside these lines, you can check out our complete guide on how to troubleshoot laptop and phone screen problems to rule out broader hardware or software issues.
In this complete guide, you’ll learn how to remove dead pixels from laptop screen. How to tell the difference between a stuck pixel, dead pixel, cable issue, and graphics problem. which repair methods are worth trying, how much laptop screen repairs typically cost, and when warranty coverage may save you money.
Every solution is based on how laptop displays actually work, from pixel behavior and display signals to ribbon cable connections, so you can diagnose the problem correctly before spending money on repairs.
Table of Contents
What are Dead Pixel Line on a Laptop, Exactly?
Every laptop screen is built from thousands of tiny dots called pixels. Each pixel is made up of three subpixels, red, green, and blue, and your display controls how bright each one glows to create every color you see. When a single subpixel loses power, you get one small, faulty dot. When an entire row or column loses signal at once, you get a visible line stretching across the display.
That distinction matters. A single dead pixel is usually one failed transistor sitting quietly in a corner of the screen. However, seeing a distinct, solid color line, such as a horizontal or vertical black line on a laptop screen, almost always points to something bigger happening behind the panel, most often an LCD data distribution ribbon failure.
A line of dead pixels almost always points to something bigger happening behind the panel, most often a signal or connection problem rather than thousands of individual dots failing at the same time.
Before you try anything else, it helps to understand which type of fault you’re actually looking at, because the fix for one is completely different from the fix for the other.
Stuck Pixel vs. Dead Pixel: Understand the Difference First
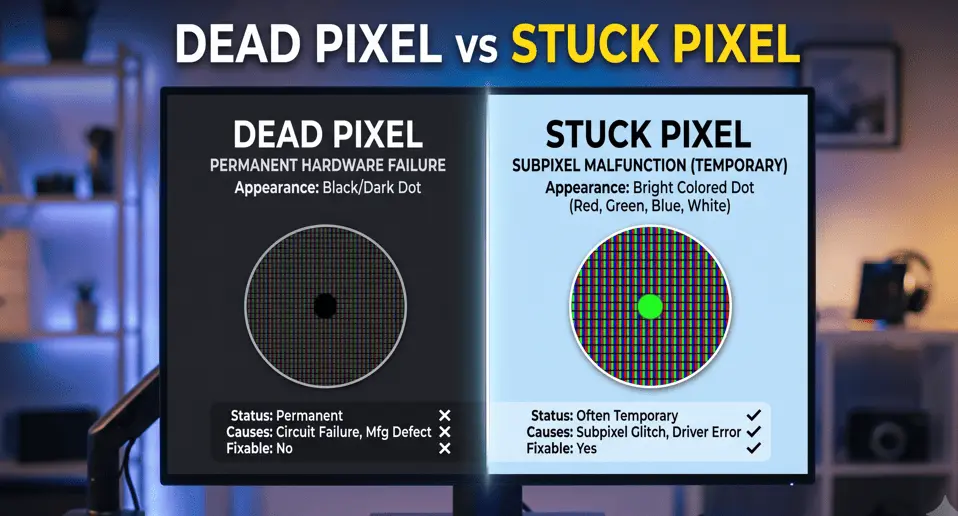
Before trying any fixes, it’s important to know whether you’re dealing with a stuck pixel or a dead pixel.
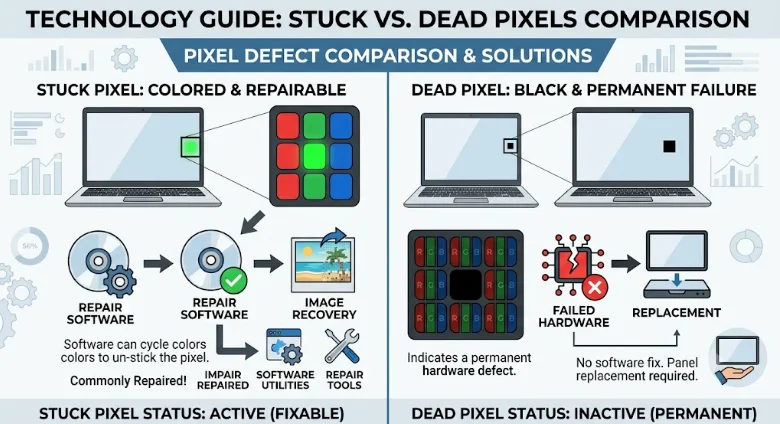
They may look similar, but they are caused by different problems, and the solutions are not the same.
| Feature | Stuck Pixel | Dead Pixel |
| What it looks like | Shows a solid color, usually red, green, blue, or white | Appears completely black |
| Main cause | The pixel’s electronics still work, but the liquid crystal is stuck in one position | The transistor or pixel hardware has failed |
| Is the pixel still working? | Yes, partially — it is still receiving power | No, it cannot display light or color |
| Can software fix it? | Often yes. Pixel repair tools may help reset it | No. Software cannot repair a failed pixel |
| Does gentle pressure help? | Sometimes, when done carefully | Usually no |
| Common example | A tiny red dot that stays visible on every screen | A small black spot that never changes |
Understanding the root cause is critical because fixing dead pixel lines on a laptop screen requires a hardware approach, whereas stuck lines can often be cleared with software or pressure cycling
Quick Test: Find Out Which One You Have
Use two simple background checks:
- Display a solid black screen.
- Display a solid white screen.
- Compare how the affected area appears on both backgrounds.
| Test Result | Likely Problem | What It Means |
| The line or mark disappears or blends into the black background | Stuck pixel or stuck pixel line | The pixel is still active and may respond to repair methods |
| The line stays visible as a dark mark on both black and white backgrounds | Dead pixel line on a laptop screen | The pixel hardware has failed and software fixes will not restore it |
This quick 30-second check helps you choose the correct fix and avoid wasting time on methods that cannot solve the problem.
What Causes Dead Pixel Lines on a Laptop Screen?
Most people assume every line means the screen itself is broken. In reality, a large share of laptop display lines trace back to something other than the pixels failing on their own.
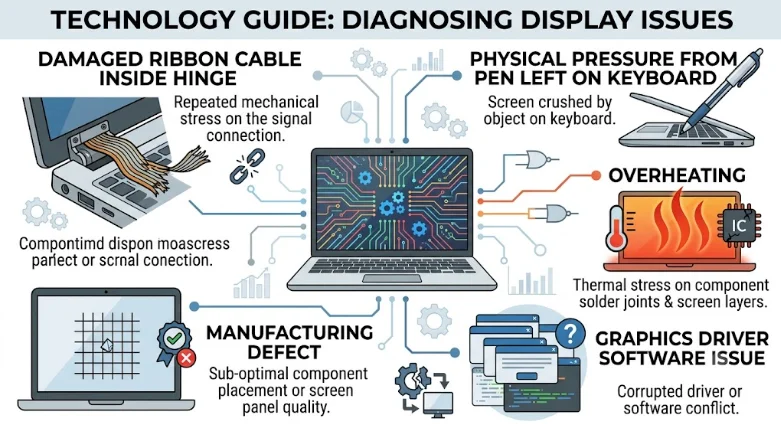
A Loose or Damaged Display Cable
The most common cause of a laptop screen line is a worn ribbon or LVDS cable, the thin connector running from your motherboard, through the hinge, up to the display panel. Every time you open and close the lid, this cable flexes slightly. Over years of daily use, tiny cracks form inside it, and the signal to one row or column of pixels gets interrupted. This is why a line often appears gradually rather than all at once, and why gently testing the hinge area or the connector can sometimes make it flicker or shift.
Physical Damage and Pressure
Closing the lid with a pen, cable, or earbud case sitting on the keyboard is one of the most common ways a laptop screen gets damaged. The pressure cracks the internal layer of the display, and a crack usually creates a line rather than a single dot. A hard drop can cause the same kind of hidden damage; the outside of the screen looks fine, but the layer underneath is compromised, and the line shows up hours or days later.
Overheating and Age
Heat gradually weakens the adhesive holding the ribbon cable in place. After three or four years of regular use, that connection can loosen on its own, even without any drops or pressure. This is one of the most frequently reported causes of display cable failure in general repair and teardown documentation for laptops.
Manufacturing Defects
Less commonly, a line is present from the very first day you turn the laptop on. This points to a panel defect from the factory rather than anything you caused. It happens more often on lower-cost panel batches, and it’s usually covered under standard warranty.
Graphics Driver and Software Glitches
Not every line is a hardware issue. An outdated or corrupted graphics driver can cause flickering lines that look almost identical to a hardware fault. This is genuinely good news, because a software problem is the cheapest and fastest thing on this entire list to fix.
A simple rule of thumb: if the line moves, flickers, changes color, or reacts when you tilt the screen, suspect a driver issue or a loose cable first. If it stays fixed in the same spot no matter what you do, suspect a true hardware fault.
How to Fix Dead Pixel Lines on a Laptop Screen (Step-by-Step)
Work through these steps in order, starting with the easiest and lowest-risk option. Stop as soon as one of them works.
Step 1: Restart Your Laptop Properly
This sounds too basic to matter, but a full restart clears temporary display glitches that can look exactly like a pixel fault. Close everything, restart completely rather than just putting the laptop to sleep, and check the screen again once it fully boots.
Step 2: Update Your Graphics Driver
An outdated graphics driver is one of the most overlooked causes of a screen line. On Windows, open Device Manager, expand Display Adapters, right-click your graphics card, and choose Update Driver. On a Mac, run Software Update from System Settings instead. If a driver conflict caused the line, it typically disappears right after the update finishes. If it’s a hardware issue, the line stays exactly where it was.
Step 3: Run a Manufacturer Diagnostic Tool
Before assuming the worst, run your laptop’s built-in hardware check. Dell Support Assist, HP PC Hardware Diagnostics, and Lenovo Vantage can all test the display panel directly and will often flag whether the fault is hardware-related or not. This step takes a few minutes and can save you from unnecessary repair costs.
If the diagnostic tool reveals deeper operating system crashes or hardware failures beyond the screen, check out our comprehensive guide on how to troubleshoot computer problems to run a full system checkup.
Step 4: Try a Pixel-Fixing Tool
If the driver update didn’t help, running a free online screen test is the next best diagnostic step. Launching a browser-based diagnostic utility allows you to cycle through pure RGB color fields to quickly verify whether you are dealing with a temporarily frozen subpixel or a complete hardware channel failure.
If the test confirms frozen subpixels, you can use built-in color-flashing tools or JScreenFix over the affected line for 20 to 30 minutes to rapidly cycle color frequencies and try to “wake up” the stuck transistors.
While web-based flashing tools work well for individual stuck subpixels, they rarely resolve physical dead pixel lines on a laptop screen if the underlying ribbon cable or panel circuit has failed.
This method only works on stuck pixels, not dead ones, and results vary. Success is far more likely if you catch the problem within the first week it appears; the longer a pixel stays frozen, the harder it becomes to restore.
Step 5: Try the Gentle Pressure Method (LCD Screens Only)
This step can help with a stuck line caused by a loose internal connection. It will not do anything for a truly dead line caused by a failed transistor, and it should never be attempted on an OLED display.
Turn the screen off, fold a soft microfiber cloth into a small pad, and press very lightly on the area directly behind the line, near the bezel edge. Turn the screen back on while still applying light pressure. If the line fades, the cause was likely a loose connection. Release slowly and watch whether it returns.
Use light pressure only. Pressing too hard can crack the LCD panel and turn one line into several.
Step 6: Test on an External Monitor
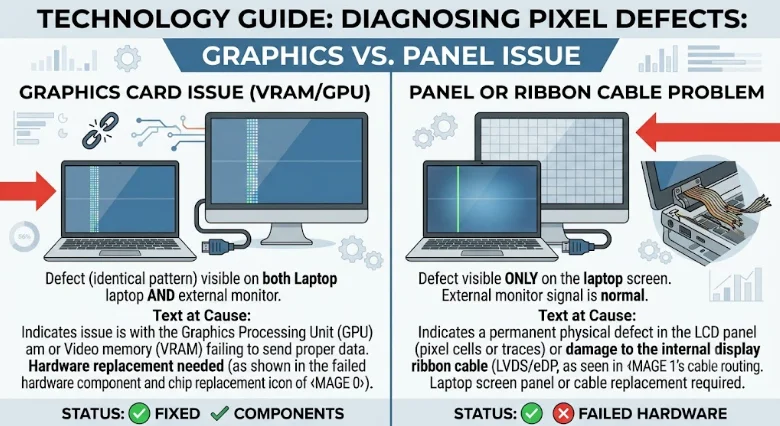
Connect your laptop to an external display using HDMI or USB-C. If the line disappears on the external screen, the problem lies in your laptop panel or its internal cable. If the line follows onto the external monitor, the issue is your graphics card, not the display itself. This one test takes under two minutes and can save you from paying for a screen replacement you didn’t actually need.
Utilizing external monitors is a great temporary workaround, especially for multitasking professionals. If your daily workflow demands multiple screens and lag-free multitasking, you might want to look into machines built specifically for heavy chart loads. Our curated list of the best laptops for trading crypto highlights notebooks with exceptional external display support and powerful processing units.
Of course, a multi-monitor setup is only useful if your connection stays online; if dropped Wi-Fi or slow internet is slowing down your workspace. You can follow our expert-tested guide to fix network problems fast using simple built-in diagnostic tools.”
Troubleshooting Checklist
Work through this list in order before contacting a repair shop:
- Restarted the laptop fully, not just from sleep
- Checked the line against both black and white backgrounds
- Updated the graphics driver to the latest version
- Ran a manufacturer diagnostic tool (SupportAssist, PC Hardware Diagnostics, or Vantage)
- Ran a pixel-cycling tool for at least 20 minutes
- Confirmed whether the screen is LCD or OLED before trying pressure
- Tried the gentle pressure method on an LCD screen (maximum two attempts)
- Connected the laptop to an external monitor to isolate the cause
- Checked the purchase date against the warranty period
- Photograph the line for your own records or for a repair shop
Advanced Fix: Opening the Laptop to Check the Display Cable
If the steps above didn’t resolve the fault, the next option involves opening the laptop case to inspect the internal ribbon cable. Only attempt this if you’re comfortable working with small screws and delicate connectors; many users choose to skip straight to a repair shop for this step instead.
Power off the laptop and remove the battery if it’s accessible. Use a plastic pry tool to remove the bezel around the screen carefully. Locate the ribbon cable connecting the panel to the board, disconnect it gently, then reconnect it firmly. This resolves lines caused by a connector that worked loose during shipping, after a drop, or from ordinary hinge wear over time. Reassemble everything and test the display before closing the case back up.
Warning: Opening the laptop case can void your manufacturer warranty on many models, so check your warranty terms first. Never force a connector into place, and never apply hard or repeated pressure anywhere on the screen, a small crack can quickly turn into several new lines. If you’re not confident in this step, a repair technician can do it far more safely.
LCD vs. OLED: Why the Fix Is Different
Before trying any fix, it’s important to know what type of screen your laptop has. The safest solution depends on whether your laptop uses an LCD or an OLED display.
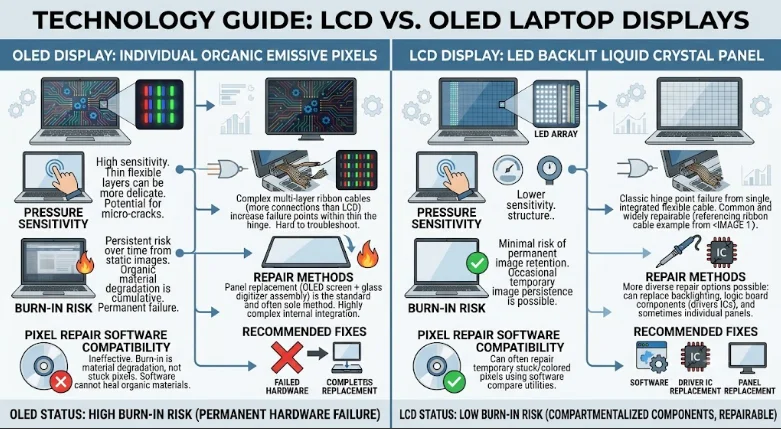
Most laptops use LCD screens, so the fixes in this guide are mainly designed for them. If your laptop has an OLED display, avoid pressing or massaging the screen. Unlike LCDs, OLED panels are much more delicate, and applying pressure can permanently damage the display.
For OLED laptops, it’s best to try software-based solutions first, such as:
- Updating your graphics drivers
- Running your laptop’s built-in display diagnostics
- Using a trusted pixel repair or pixel-refresh tool
- Restarting your laptop and checking for software-related issues
If these methods don’t solve the problem, it’s safer to have the laptop checked by a professional technician instead of trying physical repairs yourself.
Could It Be Screen Burn-In Instead?
On OLED screens, what looks like a dead pixel line isn’t always a hardware fault. It could be screen burn-in, which happens when the same image or interface stays on the screen for long periods.
For example, if the line only appears while using certain apps, games, or the Windows taskbar, burn-in is more likely than a damaged screen or loose cable.
Not Every Screen Problem Is a Dead Pixel lines
Sometimes a display issue has nothing to do with dead pixels at all.
If your screen looks:
- Slightly yellow or warm
- Too blue or too dark
- Different from how it looked before, without any visible lines
The problem is often caused by display settings, color profiles, Night Light mode, or backlight settings, not a damaged screen.
If you’re noticing a yellowish screen instead of pixel lines, check out our detailed guide on how to fix a yellow-tinted display, where we explain the most common causes and step-by-step solutions.
Checking these settings first can save you unnecessary repairs and help you identify the real cause of the problem.
Is It a Dead Pixel Line or a Graphics Card Problem?
The external monitor test from Step 6 above is the fastest way to answer this question. If the line shows up on an external display too, the fault is coming from your graphics card or its driver, not the laptop screen itself. If the external monitor looks completely clean, the panel or its internal cable is the actual problem. This single test prevents a lot of unnecessary screen replacements.
When Dead Pixel Lines on a Laptop Screen Cannot Be Fixed
Some lines are permanent. A true Dead Pixel Lines on a laptop screen means the transistor controlling that row or column has physically failed, and no restart, driver update, or software tool will bring it back.
If the line was there from the very first time you turned the laptop on, suspect a factory defect. If it appeared after a drop or after something pressed on the closed lid, suspect physical panel damage. Neither situation responds to pixel-fixing software, and the only real solutions at that point are a cable replacement or a full screen replacement.
Warranty Rules by brand: What Actually Counts as a Defect
Most manufacturers require a minimum number of defective clusters or a continuous vertical line before acknowledging dead pixel lines on a laptop screen under standard warranty terms.
This detail gets skipped in a lot of guides, but it can be the difference between paying out of pocket and getting a free fix.
| Brand | Standard Warranty Policy | Premium/Business Coverage |
|---|---|---|
| Dell | Requires 6+ stuck or 8+ dead pixels | Premium Panel Guarantee covers any single visible defect on select XPS and Precision models |
| HP | Case-by-case evaluation through HP Support | Faster single-defect review on higher-tier business laptops |
| Lenovo | IdeaPad and Yoga follow a multi-defect policy | ThinkPad Premium Support has historically covered single pixel defects |
| Apple | Evaluated case-by-case under AppleCare | Often repaired at Apple’s discretion within the first year on MacBook Pro and Air |
| Asus | Multi-defect threshold, varies by model | Select ROG and ZenBook Pro lines may receive priority review |
| Acer | Standard multi-defect policy | Limited premium coverage on select business lines |
| MSI | Case-by-case, gaming-line specific | Extended coverage available on select high-end panels |
A full line of dead pixels almost always qualifies under any brand’s policy, since a line affects far more than a single defective dot. Check your purchase date before assuming you’re out of luck. Most standard laptop warranties run 12 to 24 months, and premium business laptops often extend that coverage further.
Professional Repair Costs of Dead Pixel Lines on Laptop Screen: What to Expect
When the fixes above don’t resolve the fault, professional repair is the next step. Costs vary by laptop model, panel type, and repair shop, but here’s a realistic range based on typical consumer laptop repairs.
| Repair Type | Typical Cost Range | Turnaround Time |
|---|---|---|
| Ribbon cable repair or replacement only | Under $80 | Same day to 2 days |
| Full screen replacement (independent shop) | $100–$300 | 2–5 days |
| Manufacturer-direct repair | $150–$400+ | 5–10 days |
A simple cable repair, when that’s the actual cause, costs far less than a full panel swap. Always ask the repair shop to diagnose the cable and panel separately before agreeing to pay for a full replacement. A trustworthy technician checks both before quoting you the more expensive option.
Questions to Ask Before Paying for Repair
Ask whether the shop tested the cable separately from the panel. Ask whether the replacement part is OEM or aftermarket, since OEM panels typically color-match better and last longer. Get the repair estimate in writing before any work begins, and compare it against the price of a refurbished laptop if your device is more than four years old.
DIY Repair vs. Professional Repair
| Option | Advantages | Limitations / Risks |
| DIY Fixes | • Free or very low cost• Can be attempted within an hour • No appointment or waiting required • Good first step for simple pixel issues | • Incorrect methods can make the damage worse • Cannot restore a truly dead pixel line on a laptop screen • Opening the device may void the warranty |
| Professional Repair | • Provides accurate diagnosis of the cable, display panel, and graphics card • Uses proper tools and OEM-quality parts • Often comes with a repair warranty • Better option for serious hardware problems | • More expensive than DIY attempts • May take several days depending on parts availability • Repair quality can vary between service providers |
How to Prevent Dead Pixel Lines on a Laptop From Coming Back
Prevention is far cheaper than repair, and a few consistent habits go a long way toward protecting your screen for years.
- Never close the lid with a pen, cable, or earbud case resting on the keyboard
- Carry your laptop in a padded sleeve, especially in a bag with other hard objects
- Avoid leaving your laptop in a hot car or in direct sunlight for extended periods
- Clean your screen only with a dry or slightly damp soft cloth, never paper towels
- Open and close the lid gently instead of snapping it shut, which reduces strain on the internal cable over time
A laptop kept at a reasonable operating temperature and handled carefully rarely develops a cable-related line before the five-year mark. Heat and physical pressure are the two biggest factors that speed up this kind of hardware wear.
Software Lines vs. Hardware Lines: Quick Reference
| Symptom | Points to Software | Points to Hardware |
|---|---|---|
| Line flickers or changes color | Likely | Unlikely |
| Line shifts position when the screen is tilted | Likely | Unlikely |
| Appeared right after an update or driver install | Likely | Unlikely |
| Stays in the exact same spot regardless of what’s on screen | Unlikely | Likely |
| Gradually widens or multiplies over several weeks | Unlikely | Likely |
Expert Tips
- Run the black-and-white test first, every time. It takes ten seconds and immediately tells you which category of fix to try, saving you from wasting time on the wrong approach.
- Photograph the line on day one. If it hasn’t spread or changed a week later, you’re likely dealing with a stable stuck pixel rather than a worsening hardware fault.
- Ask the repair shop to test the cable and panel separately. This one question alone can cut your repair cost significantly if the fault turns out to be the cable.
- Check your purchase date before assuming you’re uncovered. A full line almost always meets even the strictest brand thresholds for a single-defect warranty claim.
- If you own an OLED laptop, skip the pressure method entirely. Go straight to software fixes, and contact a technician if those don’t resolve it.
Frequently Asked Questions
Can dead pixel lines on a laptop go away on their own?
Sometimes, yes. A stuck pixel line caused by a temporary signal issue can clear up within a day or two on its own. A true dead pixel line on laptop screen from hardware failure will not resolve itself and typically needs a cable repair or screen replacement.
Is it safe to press on my laptop screen to fix a line?
Light pressure for a few seconds is generally low risk on an LCD screen. Heavy or repeated pressure can crack the panel. Always use a soft cloth, and stop immediately if the line gets worse. Never try this method on an OLED display.
How do I know if it’s a dead pixel line on a Laptop or a graphics card problem?
Connect your laptop to an external monitor. If the line shows up there, too, your graphics card is the cause. If the external screen looks clean, the laptop panel or its cable is at fault.
Does JScreenFix or similar pixel-fixing software actually work?
It can work on stuck pixels by rapidly cycling colors to loosen a frozen subpixel. It does not affect a truly dead pixel, since the transistor itself has failed and there’s nothing left for the software to reactivate.
Will updating my graphics driver fix a dead pixel line on my laptop screen?
It can fix a line caused by a software glitch or an outdated driver. It won’t fix a line caused by a damaged ribbon cable or a cracked panel, since those are physical hardware problems that software can’t reach
How much does it cost to replace a laptop screen with a dead pixel line?
Most consumer laptop screen replacements run between $100 and $300 at an independent repair shop. A simple ribbon cable repair, when that’s the actual cause, often costs less than $80.
Can one dead pixel line on a laptop spread and create more lines?
Yes, this can happen if the underlying cause is a worsening cable connection or an expanding crack in the panel. A line that grows wider or multiplies over several days is a clear signal to get a professional repair soon.
Is a dead pixel line on laptop screen covered under the warranty?
Often, yes. A line affects far more pixels than the single-defect threshold most brands require for a claim. Contact your manufacturer’s support team and reference your specific model’s pixel-defect policy.
Should I try to fix it myself or go straight to a professional?
Try the free software and gentle pressure fixes first, since they carry low risk. If the line persists after a week, or if fixing it requires opening the laptop case, a professional repair is the safer and more reliable option.
Are dead pixel lines on a laptop more common on OLED or LCD Displays?
LCD panels are more prone to cable-related lines because of their ribbon-cable design. OLED panels are less prone to that specific issue, but can develop burn-in that looks similar, especially in high-use areas of the screen.
Does closing the laptop lid cause dead pixel lines on screen?
Yes, this is one of the most common causes. Objects left on the keyboard, such as a pen, a charger cable, and an earbud case, apply direct pressure to the screen when the lid closes, and this can crack the panel from the inside.
How many dead or stuck pixels are considered normal?
Manufacturers typically follow multi-pixel thresholds, often six or more stuck pixels, or eight or more dead pixels, before a screen qualifies as defective under a standard warranty. A visible line, however, is treated differently and usually qualifies on its own.
Can a dead pixel line on my laptop screen affect its resale value?
Yes. A visible screen defect is one of the first things a buyer notices, and it typically lowers resale value more than most other cosmetic issues, since display repairs tend to be one of the pricier fixes.
What tools do I need if I want to reseat the display cable myself?
A small precision screwdriver set, a plastic pry tool for the bezel, and a clean, static-free workspace are the basics. If you don’t already have these on hand, a repair shop may be the more practical option for a one-time fix.
Final Thoughts
Diagnosing dead pixel lines on a laptop screen doesn’t have to mean an immediate, expensive repair. By isolating whether the issue stems from a loose display cable, outdated drivers, or a damaged panel, you can choose the most cost-effective fix.”
The fastest way to know where you actually stand is the black-and-white test described near the top of this guide. From there, work through the free fixes, restart, update your driver, run a diagnostic tool, try a pixel-cycling program, before assuming you need a repair shop.
If the line is still there after a week of trying, stop guessing and get a proper diagnosis. Check your warranty status first, since a full line often qualifies even under strict brand policies. In most cases, a loose ribbon cable is a far cheaper fix than a full screen replacement, and only a technician can tell you which one you actually need.
Your laptop doesn’t have to stay broken. With the right test and the right fix, most dead pixel lines on a laptop screen get resolved without an expensive, unnecessary screen replacement.
Still not sure whether your line is fixable? Run through the troubleshooting checklist above first; it takes less than fifteen minutes and rules out the free fixes before you spend anything on a repair.