
If your cursor feels laggy, jumpy, or just not as responsive as it should be during competitive gaming, your mouse polling rate is one of the first things worth checking. It’s a small setting that quietly affects how smooth and precise every movement feels, yet most people never touch it because they don’t know where to look.
This guide walks through exactly how to change mouse polling rate on every major gaming mouse brands like Logitech, Razer, SteelSeries, Corsair, HyperX, Glorious, Redragon, ASUS, MSI, Cooler Master, and generic gaming mice. By the end, you’ll know how to check your current polling rate, pick the right setting for your use case, and fix the most common problems that come up along the way.
Table of Contents
What Is Mouse Polling Rate and How it Works?
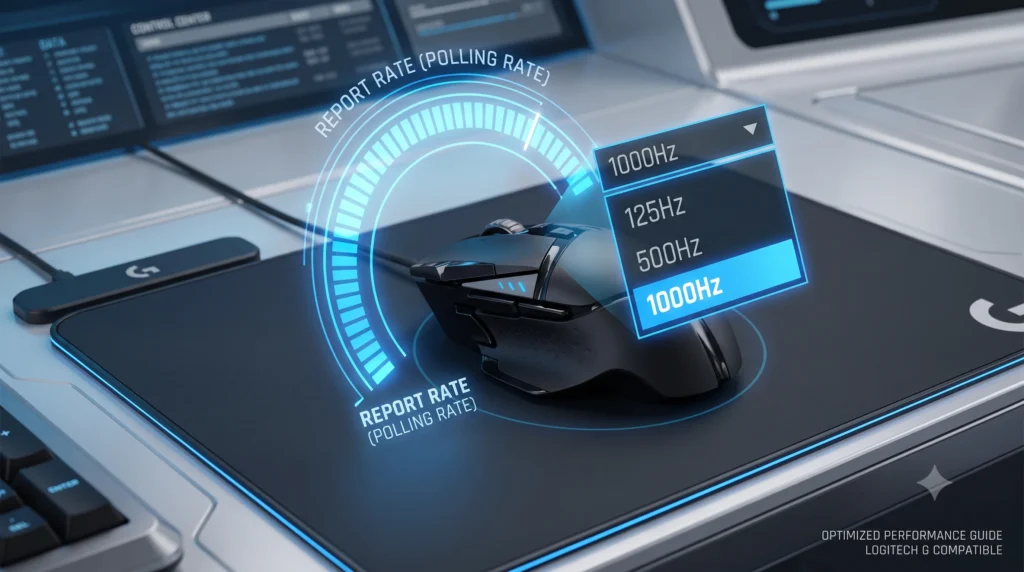
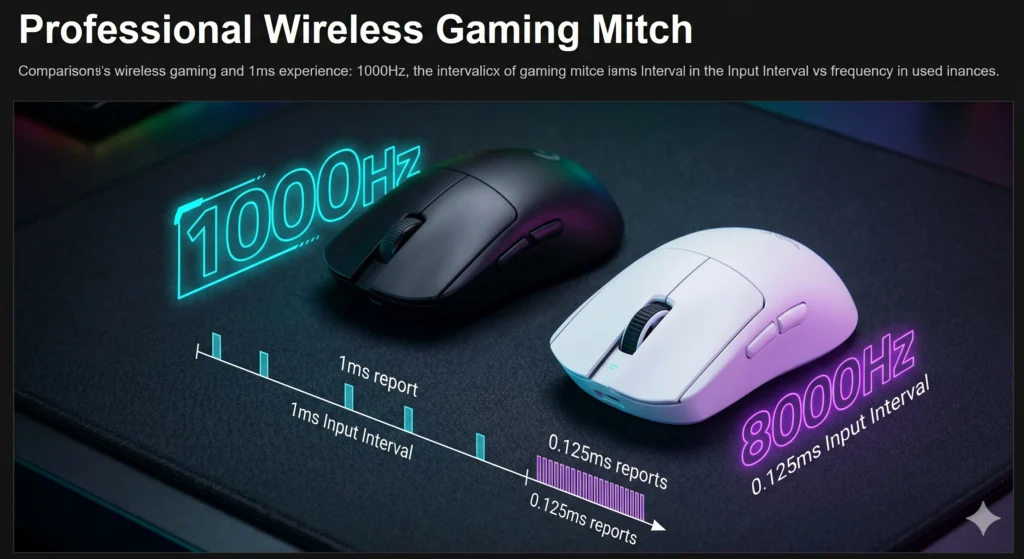
Mouse polling rate is how often your mouse reports its position to your computer, measured in Hertz (Hz). A polling rate of 1000Hz means the mouse sends an update to your PC 1,000 times per second. A lower polling rate, like 125Hz, means it only reports 125 times per second.
Think of it like a flipbook: the more frames (reports) you have per second, the smoother the motion appears. A higher polling rate doesn’t make your mouse move faster, it makes the movement data reach your computer more frequently. Which reduces the tiny delay between a physical hand movement and the cursor responding on-screen.
If you’re wondering whether this difference actually matters during gaming, our guide on whether mouse polling rate matters for gaming explains when higher polling rates can make a noticeable difference.
Most modern gaming mice support polling rate options ranging from 125Hz up to 1000Hz, and some newer models now offer 2000Hz, 4000Hz, or even 8000Hz polling rate for near-instant responsiveness. Logitech, for example, uses the term “report rate” in its own software, but it refers to the exact same concept.
Here’s a simple breakdown of how often your mouse sends updates at common settings:
| Polling Rate | Reports Per Second | Time Between Reports |
|---|---|---|
| 125Hz | 125 | 8ms |
| 250Hz | 250 | 4ms |
| 500Hz | 500 | 2ms |
| 1000Hz | 1,000 | 1ms |
| 4000Hz | 4,000 | 0.25ms |
Your mouse’s polling rate depends on the hardware inside it, not every mouse supports every rate, and ultra-high polling rates like 4000Hz or 8000Hz require dedicated mouse hardware and, in most cases, a USB dongle or dedicated software rather than a standard USB connection.
Best Polling Rate for Different Use Cases
There’s no single “best” polling rate for everyone, it depends on what you’re doing and what your hardware and PC can comfortably handle.
- Competitive/FPS gaming: 1000Hz is the standard recommendation. It offers the best balance of responsiveness and system stability.
- MOBA or RTS games: 500Hz–1000Hz works well since precision matters more than raw reaction speed.
- Everyday use, browsing, office work: 125Hz–500Hz is plenty and reduces unnecessary CPU load.
- Esports/high-end competitive gaming: 2000Hz–8000Hz, if your mouse and PC support it, for the lowest possible input lag. Read our 8000Hz vs 1000Hz comparison to see if it makes a measurable difference for you.”
- Older or lower-spec PCs: Stick to 500Hz–1000Hz. Extremely high polling rates without enough CPU headroom can occasionally cause stuttering rather than smoother performance.
How to Check Your Current Polling Rate
Before changing anything, it helps to know your current polling rate. You have a few options:
- Manufacturer software: Nearly every brand’s official software displays the active report rate in the mouse settings menu.
- Windows Registry: Advanced users can check the registry, though this method is more technical and easy to get wrong.
- Online polling rate checker: A number of free, browser-based tools let you move your mouse and instantly see your current Hz reading, making this the fastest option for most people.
Checking first gives you a baseline, so you’ll know if a change actually took effect after you adjust it.
How to Change Mouse Polling Rate Guide For All Brands
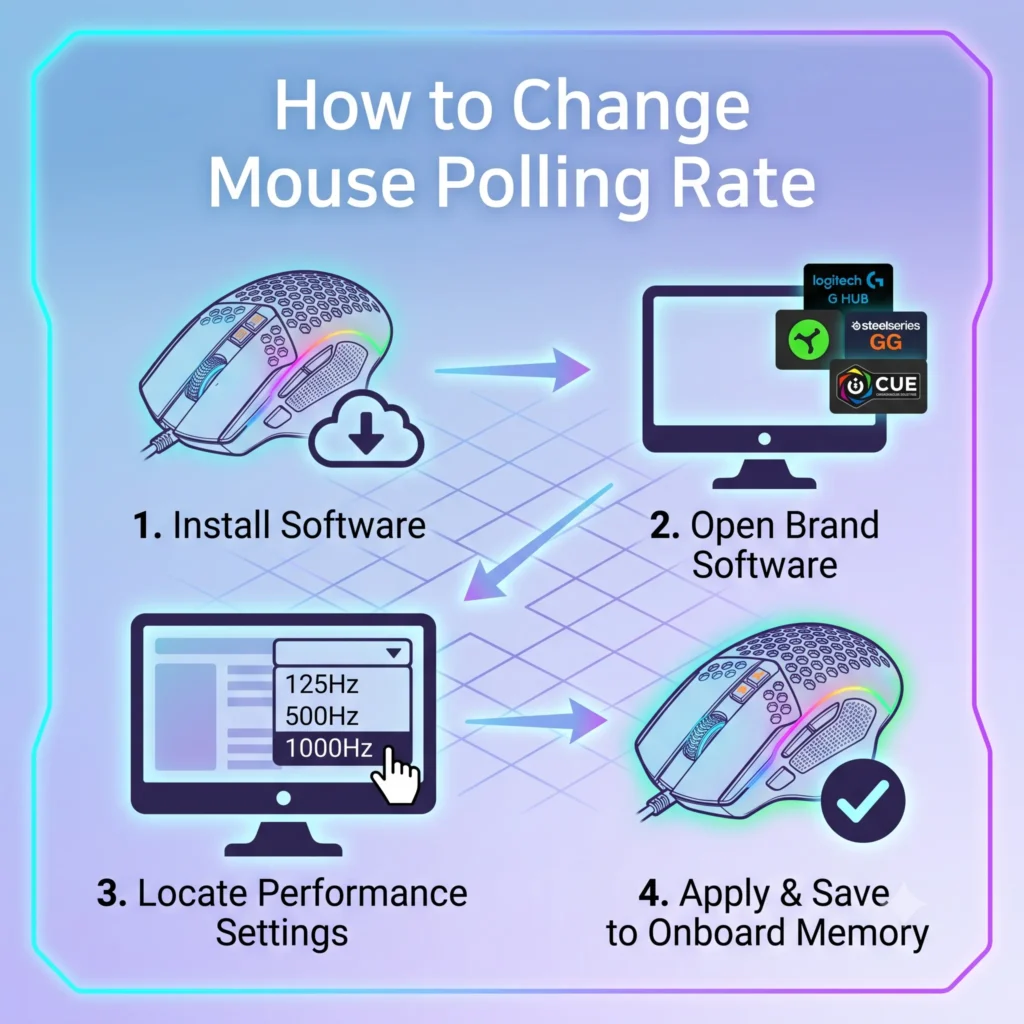
The general process is similar across brands: install the official software, select your mouse, find the performance or polling settings, and choose the new polling rate. Here’s how it breaks down for each major manufacturer.
Logitech
For a comprehensive, step-by-step walkthrough detailing different software versions, check out our full guide on how to change the polling rate on a Logitech mouse. Otherwise, follow these quick steps:
- Download and open Logitech G HUB (or Logitech Options+ for lifestyle mice).
- Select your mouse from the device list.
- Go to the Performance or Sensor tab.
- Find the Report Rate setting (Logitech’s term for polling rate).
- Choose your preferred rate, most Logitech G mice offer 125Hz, 500Hz, and 1000Hz, with newer models like the wireless gaming mouse lineup in the G Pro X Superlight and G502 X series supporting higher options.
- The change applies instantly; no restart needed.
If you run into issues or want a highly detailed walkthrough tailored to your exact G Pro, Lightspeed, or MX Master series device, check out our complete step-by-step guide to change the polling rate on a Logitech mouse.
Razer
- Open Razer Synapse.
- Select your connected mouse.
- Go to the Performance tab.
- Adjust the Polling Rate slider (options typically range from 125Hz to 1000Hz, with newer HyperPolling models reaching up to 8000Hz via a dedicated dongle).
- Save the profile.
SteelSeries
- Open SteelSeries GG (formerly SteelSeries Engine).
- Select your mouse.
- Navigate to the settings/configuration panel.
- Locate the Polling Rate dropdown and select the desired Hz value.
- Changes save automatically to the mouse’s onboard memory if supported.
Corsair
- Open iCUE.
- Select your mouse from the device list.
- Go to the Performance settings tab.
- Adjust the polling rate slider or dropdown.
- Apply and save the profile.
HyperX
- Open HyperX NGENUITY (or HyperX software for newer models).
- Select your mouse.
- Go to the performance/DPI settings section.
- Choose your polling rate from the available options.
- Confirm the change.
Glorious
- Open Glorious Core software.
- Select your connected mouse.
- Go to the Debounce & Polling or Performance tab.
- Pick your polling rate (Glorious mice commonly offer up to 1000Hz, with select models supporting 4000Hz or 8000Hz).
- Save the configuration to onboard memory.
Redragon
- Download and install the Redragon software matching your specific mouse model (Redragon uses different apps per product line).
- Open the app and select your device.
- Look for the Polling Rate or Report Rate section.
- Select your preferred setting from the dropdown.
- Apply changes.
ASUS (ROG)
- Open Armoury Crate.
- Select your ROG mouse under connected devices.
- Go to the mouse settings panel.
- Adjust the Polling Rate option.
- Save your profile.
MSI
- Open MSI Center or the dedicated peripheral app (e.g., MSI Clutch software).
- Select your mouse.
- Navigate to performance settings.
- Choose your polling rate.
- Apply and confirm.
Cooler Master
- Open Cooler Master MasterPlus+.
- Select your connected mouse.
- Go to the Performance tab.
- Select the polling rate from the available options.
- Save the profile to the mouse if onboard memory is supported.
Generic/Unbranded Gaming Mouse
If your mouse didn’t come with dedicated software, or you’re using a generic gaming mouse:
- Check the manufacturer’s website for any official software, many budget brands still offer basic configuration apps.
- If no software exists, try a universal mouse configuration tool, though results vary by hardware.
- As a last resort, some polling rate adjustments can be made at the driver level in Windows Device Manager, though this offers less control than dedicated software.
Windows Settings
Windows itself doesn’t have a native, user-facing polling rate menu, this setting lives entirely within the manufacturer’s official software or, in rare cases, the mouse driver. If you’ve adjusted the polling rate through your mouse software and don’t see a difference, double-check:
- The mouse is plugged into a USB 2.0 or 3.0 port directly (not through a low-quality hub)
- Windows mouse drivers are up to date
- No conflicting third-party mouse utilities are running simultaneously
Mac Considerations
Mac support for changing mouse polling rate depends entirely on whether the manufacturer offers macOS software. Logitech, Razer, and SteelSeries all provide Mac-compatible apps with polling rate controls, though feature parity with the Windows versions can lag behind. If your mouse brand doesn’t offer official software, adjusting the mouse polling rate on macOS may not be possible without third-party utilities, which can be less reliable.
Linux Considerations
Linux users typically don’t have access to official manufacturer software, but the mouse polling rate can often be changed manually using command-line tools or open-source utilities designed for gaming peripherals. This method requires more technical comfort than the Windows or Mac experience, since there’s no unified official software across mouse manufacturers for Linux.
Common Problems and Fixes
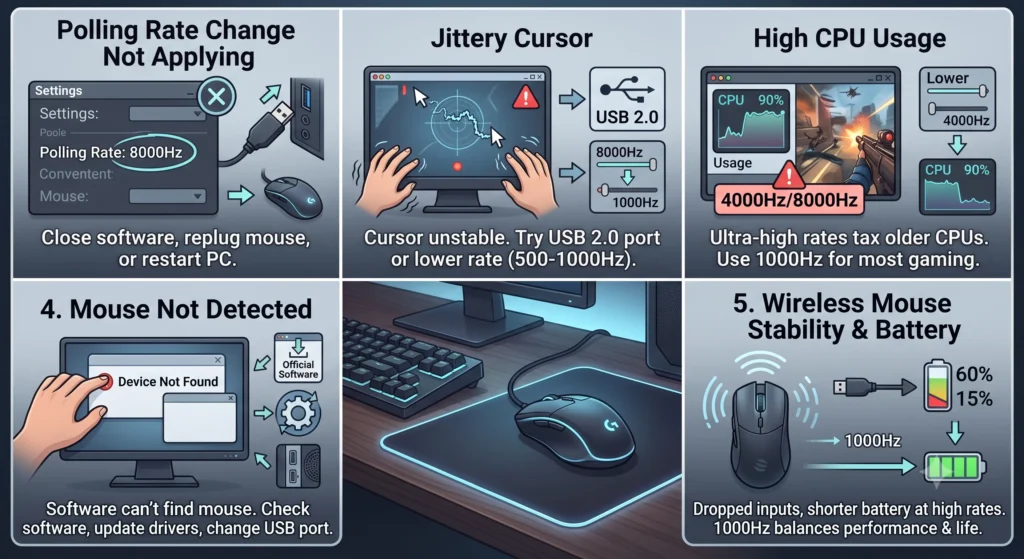
The polling rate change doesn’t seem to apply. Close and reopen the software, unplug and replug the mouse, or restart your PC. Some mice only apply new settings after a full reconnect.
Cursor feels jittery after increasing polling rate. This can happen on older PCs or with a poor-quality USB cable/port. Try a different port, use USB 2.0 rather than a hub, or lower the polling rate back to 500Hz or 1000Hz.
High CPU usage after switching to 4000Hz or 8000Hz. Extremely high polling rates use noticeably more CPU resources. If you’re not playing at a competitive/professional level, 1000Hz is usually the more practical choice.
Software won’t detect the mouse. Confirm you’re using the official software for your exact mouse model, check for driver updates, and try a different USB port.
Wireless mice showing lower stability at high polling rates. Wireless mice can be more sensitive to interference at ultra-high polling rates. Battery life also decreases as polling rate increases, since the mouse communicates more frequently. If you notice more dropped inputs, consider stepping down to 1000Hz for a better balance between performance and battery life.
Frequently Asked Questions (FAQ)
What is the best polling rate for gaming?
1000Hz is the most common recommendation for gaming, offering a strong balance between responsiveness and system stability. Competitive players chasing the lowest possible input lag sometimes go higher, to 2000Hz or above, if their mouse and PC support it.
Does polling rate affect FPS (frames per second)?
Not directly. Polling rate affects how often mouse input reaches your PC, not how many frames your GPU renders. However, extremely high polling rates can add slight CPU overhead on lower-end systems, which could indirectly affect performance in CPU-bound games.
Is 1000Hz polling rate enough?
For the vast majority of gamers, yes. 1000Hz has been the gaming standard for years and remains more than sufficient for the overwhelming majority of use cases outside professional esports.
Can every mouse change its polling rate?
No. Polling rate options depend on the mouse’s internal hardware. Basic office mice are often fixed at 125Hz, while gaming mice typically support a range of adjustable options.
Does higher polling rate drain battery faster on wireless mice?
Yes. Since the mouse communicates with your PC more frequently at higher polling rates, wireless gaming mice will generally see reduced battery life at 1000Hz or above compared to lower settings.
How do I know if my new polling rate setting actually worked?
Use your manufacturer’s software, which often displays the current active rate, or use an online polling rate checker to confirm the change in real time.
Expert Tips
- Always update your mouse’s official software before adjusting polling rate, older versions may not support the option to change to your mouse’s full range of settings.
- If you play competitively, test different polling rate settings, over a few sessions rather than relying on specs alone; how it feels to you matters more than the number itself.
- Pair a higher polling rate with a higher monitor refresh rate for the most noticeable improvement, the two work together to reduce perceived lag.
- If you use multiple mice across different PCs, note that switching polling rates can occasionally require re-pairing wireless dongles.
Key Takeaways
- Mouse polling rate is how often your mouse reports its position, measured in Hz.
- 1000Hz is the standard recommendation for gaming; higher settings offer diminishing but real returns for competitive gaming.
- Polling rate and DPI are different settings that work together, not interchangeably.
- Every major brand (Logitech, Razer, SteelSeries, Corsair, HyperX, Glorious, Redragon, ASUS, MSI, Cooler Master) requires their own official software to change mouse polling rate.
- Mac and Linux support depends on manufacturer software availability, with Linux requiring more manual configuration.
- Wireless mice trade battery life for higher polling rate performance.
Conclusion
Changing your mouse polling rate is a quick, free way to make your cursor feel more responsive, especially if you play competitive games regularly. Once you know how often your mouse sends updates and how to adjust that setting through your manufacturer’s official software, you can fine-tune performance to match your exact setup, whether that’s chasing every millisecond of advantage or just finding a comfortable, stable middle ground for everyday use.
Not sure what your mouse is currently set to? Use our free Mouse Polling Rate Tester to check your current Hz in seconds, no downloads required.