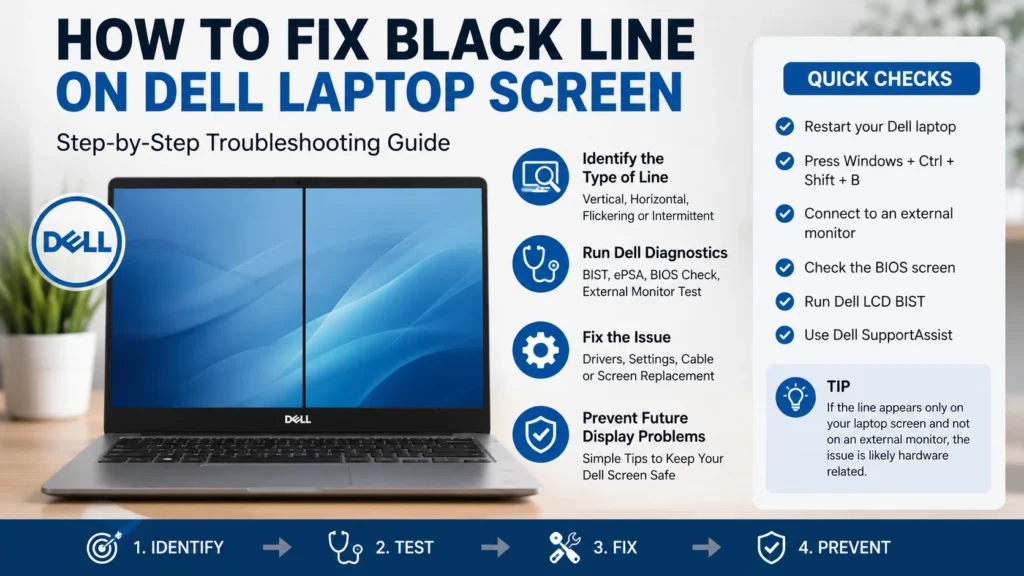
If you suddenly notice a black line on your Dell laptop screen, don’t assume the display is permanently damaged. In many cases, the problem is caused by a loose display cable, a graphics driver issue, incorrect display settings, or a temporary software glitch. Some issues can be fixed at home in just a few minutes, while others require a screen replacement or professional repair.
This guide focuses specifically on Dell laptops and walks you through identifying the exact type of screen line before applying the correct solution. If you’re trying to diagnose a similar issue on another laptop brand, our complete guide covering laptop screen line issues explains the most common causes and fixes.
Following the right troubleshooting steps first can save both time and repair costs.
Quick Answer
A black line on your Dell laptop screen usually points to either a software problem or a hardware issue. The most common causes include
- a damaged LCD panel
- a loose display cable near the hinge
- outdated graphics drivers
- incorrect display settings or GPU-related problems.
Before trying any repair, perform these quick checks:
- Restart your Dell laptop.
- Press Windows + Ctrl + Shift + B to reset the graphics driver.
- Connect your laptop to an external monitor.
- Check whether the line appears in the BIOS.
- Run Dell SupportAssist or Dell’s built-in display diagnostics.
If the line appears only on the laptop display but not on an external monitor, the problem is usually with the Dell laptop display, LCD panel, or display cable. If the same line appears on both screens, the issue is more likely related to the graphics driver or GPU.
If the affected area looks like a row of tiny stuck pixels instead of a solid line, learn how to troubleshoot pixel line problems before replacing the screen.
The next sections will help you identify the exact type of line you are seeing so you can choose the correct fix instead of guessing.
Table of Contents
Expert Diagnosis Workflow
Professional technicians rarely replace a Dell laptop screen based on symptoms alone. Instead, they isolate the fault in a logical order to avoid replacing working components.
Follow this sequence:
- Run the Dell LCD Built-In Self-Test (BIST).
- Check whether the black line is visible in the BIOS.
- Connect an external monitor.
- Perform the Windows screenshot test.
- Inspect the display cable only after software has been ruled out.
This workflow quickly separates software problems from LCD, display cable, motherboard, and GPU failures. Dell recommends using the LCD BIST because it runs independently of Windows and graphics drivers, making it one of the most reliable first diagnostic steps.
Key Takeaways
If you only have a minute, remember these important points before troubleshooting your Dell laptop.
- A black line on a Dell laptop screen is usually caused by either a graphics driver problem or faulty display hardware.
- If the line appears during the Dell LCD Built-In Self-Test (BIST) or in the BIOS, the issue is almost always hardware-related.
- If the line appears only after Windows starts, update or reinstall your Dell graphics driver before replacing any parts.
- A line that changes when opening or closing the lid usually indicates a worn LCD cable near the hinge, especially on Dell Inspiron models.
- If the same line appears on both your laptop screen and an external monitor, the graphics processor or motherboard may require professional repair.
- Always check your Dell warranty using the Service Tag before paying for a screen replacement.
Which Dell Laptops Commonly Develop Black Screen Lines?
A black line on a Dell laptop screen can happen on almost any model. However, some series experience certain display issues more often because of their design, hinge movement, or daily usage.
Dell Inspiron
Among consumer Dell laptops, Inspiron models frequently experience display cable fatigue because the cable repeatedly flexes through the left hinge during normal use. Over time, this repeated movement can damage the cable and lead to vertical lines, intermittent flickering, or image loss. Service documentation and repair communities consistently identify hinge-area cable wear as a common failure point.
Examples include:
- Inspiron 15 3000 Series
- Inspiron 3501
- Inspiron 3520
- Inspiron 15 5000
Dell XPS
The Dell XPS series uses extremely thin InfinityEdge display assemblies. While these displays provide excellent image quality, the compact design leaves less tolerance for physical pressure. A heavy object placed on the closed lid or a minor drop may damage the LCD matrix without cracking the outer glass.
Common models include:
- XPS 13 9310
- XPS 15 9500
- XPS 15 9510
Dell Latitude
Business-oriented Latitude laptops typically experience display problems after years of heavy daily use. Common issues include worn LCD cables, loose connectors, aging LCD panels, and graphics driver conflicts following enterprise software deployments.
Dell Vostro
Vostro models are designed for small businesses. Like Inspiron laptops, repeated hinge movement may damage the cable that connects the screen to the motherboard. This can result in lines across your screen or occasional screen flickering.
Dell Precision
Precision workstations often use dedicated NVIDIA Quadro/RTX or AMD Radeon Pro graphics cards. If a black line appears on both the laptop display and an external monitor, the GPU or graphics driver should be investigated before considering a screen replacement.
Tip: Knowing your laptop model helps narrow down the possible cause and allows you to follow the most effective troubleshooting steps.
Identify Your Dell Screen Line Before Fixing It
Not every black line on your Dell laptop has the same cause. The appearance of the line provides important clues about the underlying problem. Identifying the pattern first makes troubleshooting faster and prevents unnecessary repairs.
Vertical Black Line on Dell Laptop Screen
A single vertical line usually points to a hardware problem. Common causes include:
- Loose or damaged display ribbon cable
- Faulty Dell LCD panel
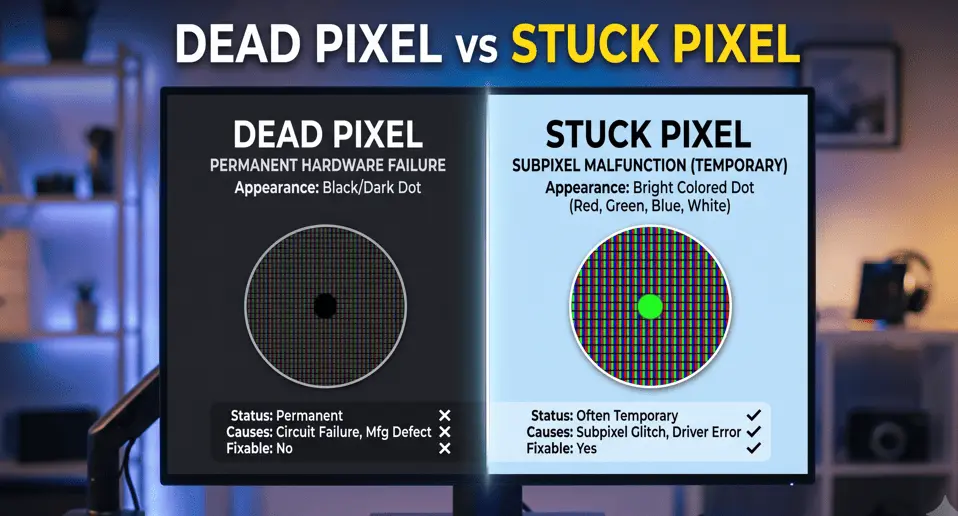
- Dead pixel column
- Damage caused by pressure on the screen
If the line stays in the same position after restarting, it is unlikely to be a temporary software issue.
Horizontal Black Line on Dell Laptop Screen
A horizontal line often appears because of a failing LCD panel, damaged display cable, or incorrect refresh rate. In some cases, outdated graphics drivers can also create horizontal black lines across the display.
If you notice multiple horizontal lines on your Dell laptop screen, continue using the laptop as little as possible until you identify the cause. Ignoring the problem may allow the damage to spread.
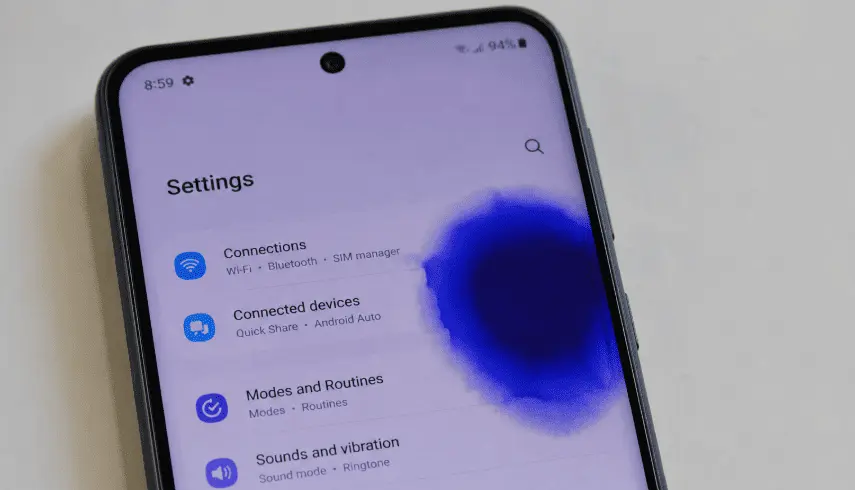
Not every display defect appears as a line. If you notice a localized area of unusual color instead, you may be dealing with a different panel problem. For example, a patch on a mobile screen can result from pressure, moisture, or display panel damage.
Flickering Black Line on Dell Laptop Screen
If the line flickers or appears only sometimes, the problem is often related to:
- Loose internal display cable
- Driver issue
- Refresh rate mismatch
- Temporary graphics glitches
A flickering line is usually easier to fix than a permanent one, especially if it disappears after restarting or updating drivers.
Black Line That Appears When Opening the Lid
If the line appears only while moving the screen, the display cable is the most likely cause. This cable connects the screen to the motherboard and passes through the laptop hinge. Over time, repeated opening and closing can weaken the cable and create intermittent display problems.
Typical signs include:
- The line disappears when the lid is held at a certain angle.
- The line changes position while moving the screen.
- The display flickers before the line appears.
Black Line Only After Windows Starts
If the Dell logo and BIOS screen look normal, but the black line appears only after Windows loads, the issue is usually software-related. Possible causes include:
- Corrupted graphics driver
- Incorrect Windows display settings
- Recent Windows update
- Resolution or refresh rate conflict
In this situation, you should first update or reinstall the graphics driver before considering hardware repairs. By identifying exactly when the line appears and how it behaves, you can quickly determine whether you’re dealing with a software problem, a damaged display component, or a more serious hardware issue.
In the next section, we’ll perform Dell-specific diagnostic tests to confirm the exact cause before applying any fixes.
Quick Diagnosis: Match Your Symptom to the Right Fix
Use this table to quickly identify the most likely cause before starting Dell’s diagnostic tests.
| What You See | Most Likely Cause | Try This First |
| Single vertical black line | LCD cable or LCD panel | Run Dell LCD BIST |
| Horizontal black line | LCD panel or refresh rate | Check refresh rate |
| Flickering black line | Loose display cable | Move the lid gently |
| Line appears after Windows starts | Graphics driver | Reinstall Dell graphics driver |
| Line appears in BIOS | Hardware failure | Run Dell ePSA Diagnostics |
| Line changes while opening the lid | Worn display cable | Inspect the hinge cable |
| Line appears on both laptop and external monitor | GPU or motherboard | Run Dell hardware diagnostics |
This quick reference helps you avoid unnecessary repairs and choose the correct troubleshooting step from the beginning.
Dell Display Diagnostic Tools
Dell includes several built-in tools that make diagnosing screen problems much easier.
| Tool | Purpose |
| Dell LCD Built-In Self-Test (BIST) | Checks whether the LCD panel is faulty |
| Dell ePSA Diagnostics | Tests hardware before Windows loads |
| Dell SupportAssist | Updates drivers and scans hardware |
| BIOS Screen | Helps distinguish hardware from software problems |
| Service Tag | Checks warranty status and recommended drivers |
Using these tools before replacing any hardware can save both time and money.
Run These Dell-Specific Tests First
Before replacing your screen or opening the laptop, run these Dell-specific tests. They help identify whether the problem comes from the Dell laptop display, graphics hardware, drivers, or another component.
Perform the tests in the order below. Each one provides a clear clue about what is causing the black line on your Dell laptop screen. In many cases, these simple checks can prevent unnecessary repairs and help you resolve display issues much faster.
1. Dell LCD Built-In Self-Test (BIST)
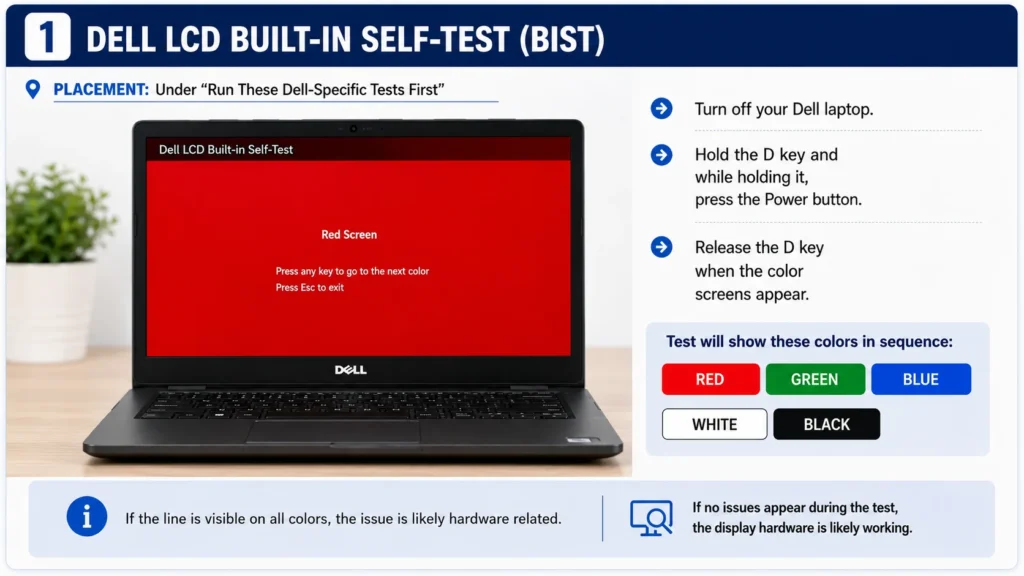
The Dell LCD Built-In Self-Test (BIST) is one of the quickest ways to determine whether the problem is caused by the LCD panel itself or another part of the system.
Unlike Windows, this test runs independently of your operating system and graphics drivers. It displays solid colors directly on the screen, making it easier to identify hardware faults.
How to Run Dell LCD BIST
On most Dell laptops:
- Turn off your laptop.
- Press and hold the D key.
- While holding D, press the power button once.
- Release both keys when solid color screens begin to appear.
(Some older Dell laptops use a different key combination. If the test does not start, check your laptop model on Dell’s support website.)
What the Results Mean
If the black line appears during the BIST test
The LCD panel or display hardware is likely faulty. Because Windows is not running, software is no longer involved. Possible causes include:
- Damaged LCD screen
- Failing display cable
- Internal Dell display hardware fault
If the line disappears during BIST
The LCD panel is likely healthy, indicating the issue stems from graphics drivers or software settings. To confirm panel matrix health across full-screen RGB layers before moving to OS drivers, run a free online screen test inside Windows. This helps quickly isolate driver glitches from hardware trace faults.
Common software-level causes include:
- Graphics driver
- Windows display settings
- Recent software changes
- GPU configuration
This is an excellent sign because software problems are usually easier to fix than hardware failures. Expert Tip: Whenever I troubleshoot Dell laptops, I run the LCD BIST before changing drivers. It often reveals whether I should focus on hardware or software, saving valuable time.
2. Dell ePSA Diagnostics
If the BIST does not identify the issue, run Dell ePSA (Enhanced Pre-Boot System Assessment). This built-in diagnostic checks major hardware components before Windows starts. While it cannot repair a damaged screen, it can detect graphics hardware and other system problems that may cause display issues.
How to Run Dell ePSA
- Turn off the laptop.
- Turn it back on.
- Repeatedly press F12 until the Boot Menu appears.
- Select Diagnostics.
- Allow the test to complete.
The scan may take several minutes depending on your Dell laptop configuration.
What the Results Mean
No errors found. The hardware is likely functioning correctly. Continue with software troubleshooting, including graphics drivers and Windows settings. Display or graphics errors reported
The problem may involve:
- LCD hardware
- GPU
- Motherboard
- Internal display components
Write down any error code before restarting. It will help if you later contact Dell technical support or visit a repair center.
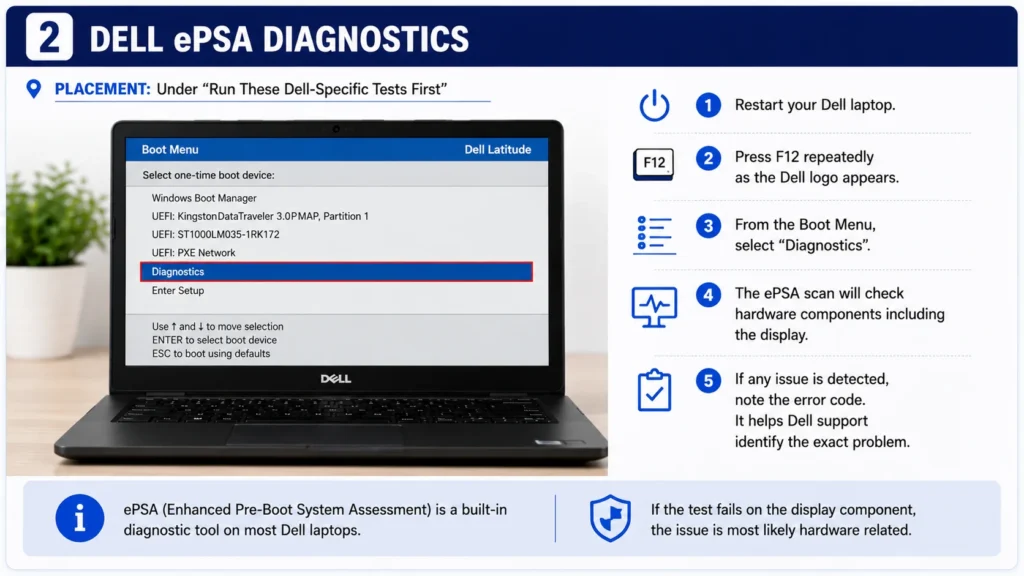
3. Check the BIOS Screen
Checking the BIOS is one of the easiest ways to determine whether Windows or the laptop hardware causes the black line. Since the BIOS loads before Windows, software problems cannot affect it.
How to Check
- Turn off your Dell laptop.
- Turn it back on.
- Press F2 repeatedly to enter BIOS Setup.
- Observe the screen.
What the Results Mean
The line is visible in BIOS. This almost always indicates a hardware issue. Likely causes include:
- Damaged LCD panel
- Loose display cable
- Faulty display connector
- GPU hardware failure
Updating drivers will not solve this type of problem. The line disappears in BIOS.The hardware is probably working correctly.
Instead, investigate:
- Graphics drivers
- Windows update conflicts
- Display settings
- Resolution or refresh rate problems
This simple test often separates hardware faults from software problems in less than two minutes.
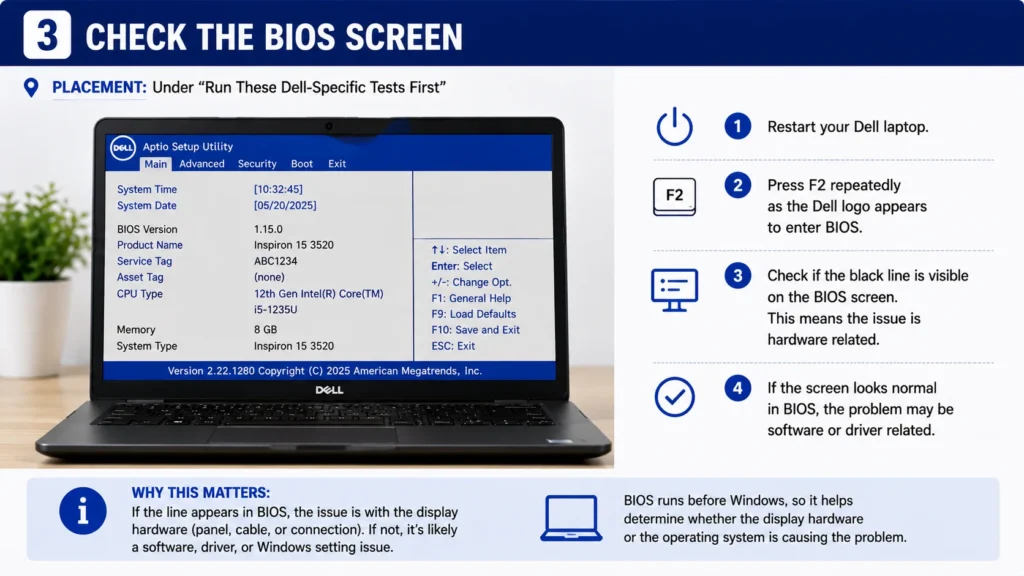
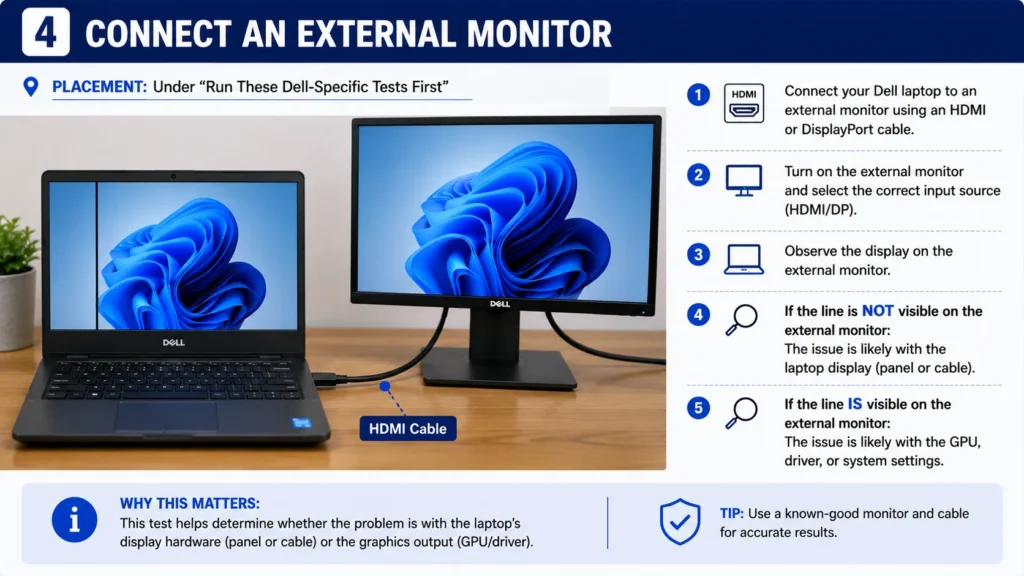
4. Connect an External Monitor
An external monitor test is one of the most reliable ways to identify whether the fault is inside the laptop display or elsewhere. Use an HDMI, USB-C, or DisplayPort cable to connect your laptop to an external monitor or TV. After connecting, press Windows + P and select Duplicate or Extend.
What the Results Mean
The external monitor looks normal. If the black line appears only on the laptop’s built-in display and not on an external monitor, the graphics processor is usually working correctly.
The issue is likely one of these:
- Damaged LCD screen
- Worn display cable
- Faulty display connector
These problems often require a hardware repair or screen replacement. The external monitor shows the same black line. If both displays show identical lines across the screen, the problem is probably not the LCD panel.
Instead, investigate:
- Graphics driver
- GPU
- Motherboard
This result changes the entire troubleshooting direction and helps avoid replacing a perfectly good screen.
5. Screenshot Test
The screenshot test is simple, but it provides valuable information. It helps determine whether Windows is actually rendering the line or whether only the physical display is affected.
How to Perform the Test
- When the line is visible, press Windows + Shift + S.
- Capture the affected area.
- Save the screenshot.
- Open it on another computer or phone if possible.
What the Results Mean
The line appears in the screenshot. Windows has captured the line.
This usually points to:
- Graphics driver issue
- GPU problem
- Software rendering fault
Continue with driver updates before considering hardware repairs. The line does not appear in the screenshot. If the screenshot looks normal, Windows is generating a healthy image. The fault is almost certainly in the display hardware, such as:
- LCD panel
- Display cable
- Dell display connector
This is one of the strongest indicators that the problem is physical rather than software.
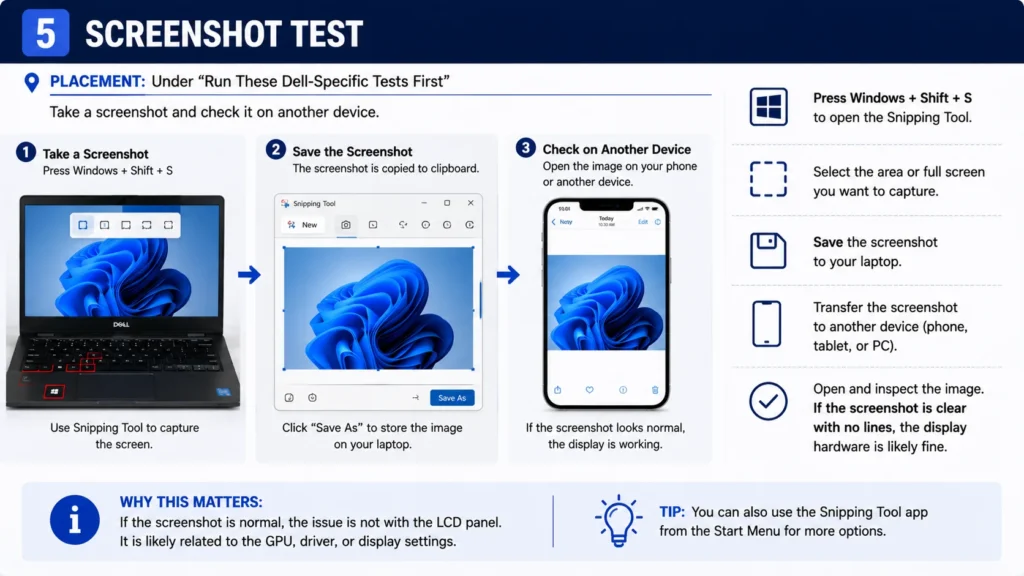
After completing these five tests, you should have a much clearer understanding of whether you’re dealing with a software conflict or a hardware fault. The next section explains the most common Dell-specific causes behind each result and how to fix them correctly.
What Your Test Results Mean
After completing the Dell-specific tests, you should have a good idea of what is causing the black line on your Dell laptop screen. Instead of guessing, use the table below to match your test results with the most likely cause and the recommended next step.
| Test Result | Likely Cause | Next Step |
| Black line appears during Dell LCD BIST | Damaged LCD panel or internal display hardware | Inspect the display cable. Replace the LCD panel if necessary. |
| BIST passes but the line appears only in Windows | Graphics driver issue, incorrect display settings, or recent Windows Update | Update or reinstall the graphics driver and check the screen resolution. |
| Line is visible in the BIOS | Hardware issue with the LCD, display cable, connector, or GPU | Continue with hardware inspection or contact Dell Technical Support. |
| BIOS looks normal but Windows shows the line | Software conflict or graphics driver problem | Install Dell-approved graphics drivers and restart the laptop. |
| Line appears only on the Dell laptop screen | LCD panel, display cable, or display connector problem | Inspect the display cable and consider a screen replacement if required. |
| Line appears on both the laptop and an external monitor | Graphics card or motherboard failure | Diagnose the GPU and motherboard. Professional repair is usually required. |
| Screenshot contains the line | Graphics rendering problem or GPU fault | Update Intel or NVIDIA drivers and test again. |
| Screenshot looks normal but the screen still shows the line | Physical LCD or cable problem | Inspect the LCD assembly and display cable. |
| The line changes when opening or closing the lid | Worn display cable near the hinge | Replace the LCD cable. This is common on Dell Inspiron laptops. |
| Screen flickers before the line appears | Loose display cable or unstable graphics driver | Check the cable first, then update Dell graphics drivers. |
This simple decision table helps you troubleshoot your display issue without replacing parts unnecessarily. It also makes it easier to explain the problem if you later need professional repair.
How Professional Repair Technicians Diagnose Black Screen Lines
Repair technicians rarely begin by replacing the LCD panel. Instead, they eliminate the most common causes in order. A typical workflow is:
| Step | What it Rules Out |
|---|---|
| LCD BIST | LCD panel defects |
| BIOS check | Windows/software problems |
| External monitor | GPU or motherboard faults |
| Screenshot test | Graphics rendering issues |
| Lid movement test | Display cable failure |
Following this sequence minimizes unnecessary repairs and helps identify the correct component before purchasing replacement parts.
| Symptom | Most Likely Cause |
|---|---|
| Line changes when moving lid | Display cable |
| Line visible in BIOS | LCD or hardware |
| Line appears only in Windows | Graphics driver |
| Screenshot contains line | GPU/driver |
| Screenshot is clean | LCD panel |
| External monitor is normal | LCD cable or panel |
| External monitor also has line | GPU or motherboard |
Most Common Causes of Black Line On Dell Laptop Screen
Dell laptops are generally reliable, but certain display problems appear more frequently on specific models and after years of regular use. Understanding the exact cause helps you choose the correct repair instead of replacing parts unnecessarily.
1. Worn Display Cable Near the Left Hinge
One of the most common causes of a line on your Dell laptop is a worn display cable. The cable that connects the screen to the motherboard passes through the left hinge. Every time you open or close the lid, the cable bends slightly. After thousands of cycles, it can weaken or develop tiny breaks.
This problem is especially common on Dell Inspiron laptops because they are frequently opened and closed throughout the day.
Common Signs
- The line changes when you move the lid.
- The display flickers while adjusting the screen.
- The screen works normally at certain angles.
- The problem becomes worse over time.
If these symptoms match your laptop, replacing the cable is often enough to fix common display issues without replacing the entire LCD.
2. Damaged LCD Panel
A damaged LCD screen is another common reason Dell laptop owners see a permanent black line that doesn’t go away.
Unlike software problems, physical panel damage usually remains visible at all times.
Common causes include:
- Dropping the laptop
- Pressure on the closed lid
- Carrying the laptop without protection
- Accidental impact
A damaged panel may also show:
- Horizontal or vertical lines
- Dead pixel columns
- Screen flickering
- Ink-like patches
- Cracks beneath the glass
Unfortunately, an internally damaged LCD cannot be repaired. The permanent solution is usually replacing the entire screen.
3. Dell Display Connector Problems
The display connector links the LCD cable securely to the motherboard. If this connector becomes loose, dirty, or damaged, it can interrupt the video signal and create lines across your screen, flickering, or a completely black screen.
Although less common than cable wear, connector problems are often seen after previous repairs or accidental drops. Unless you have experience working with laptop hardware, avoid disconnecting the connector yourself, as improper handling may create additional screen problems.
4. Intel/NVIDIA Driver Issues
Not every display problem is caused by damaged hardware.
A corrupted Intel or NVIDIA graphics driver can cause:
- Random horizontal lines on the screen.
- Screen flickering.
- Resolution problems.
- Display glitches after a Windows Update.
- Temporary black lines during startup.
These issues often disappear after updating or reinstalling the correct graphics driver from Dell or the GPU manufacturer. If the line only appears after Windows loads and does not appear during BIOS or BIST testing, a driver issue becomes much more likely.
5. GPU Failure (Mostly Older Gaming or Precision Models)
Older gaming laptops and some Dell Precision workstations use dedicated graphics processors that generate additional heat over time.
As the GPU ages, it may begin producing:
- Multiple black lines.
- Colored artifacts.
- Display corruption.
- Random crashes.
- A screen black condition during startup.
A failing GPU usually affects both the internal display and any external monitor connected to the system. If your diagnostic tests show identical problems on both displays, GPU hardware should be considered before replacing the LCD.
6. Recent BIOS or Driver Update
Occasionally, users notice issues on their Dell immediately after installing a BIOS update or new graphics driver. While updates generally improve system stability, a failed installation or incompatible driver can introduce temporary display problems. If the line appeared shortly after an update:
- Roll back the graphics driver if possible.
- Install the latest driver from Dell’s official support page.
- Check whether Dell has released a newer BIOS that addresses the issue.
If the problem started immediately after updating and all hardware tests pass, software is usually the most likely cause rather than a faulty display.
How to Fix Black Lines on a Dell Laptop Screen?
Now that you’ve identified the likely cause, it’s time to apply the right fix. Start with the easiest solutions first. Many Dell laptop screen problems are caused by software or settings and can be resolved without opening the laptop.
Follow these fixes in order. After each step, check whether the black line on your Dell laptop has disappeared before moving to the next solution.
Restart and Reset the Graphics Driver
A temporary graphics glitch can cause a black line, screen flickering, or other display issues. Restarting the laptop refreshes Windows and clears temporary system errors. If restarting doesn’t help, reset the graphics driver without rebooting.
Restart Your Dell Laptop
- Save your work.
- Click Start > Power > Restart.
- Wait until Windows loads completely.
- Check if the line is still visible.
Reset the Graphics Driver
Windows includes a built-in shortcut that restarts the graphics driver without affecting your files.
Press: Windows + Ctrl + Shift + B
The screen may briefly go black, and you might hear a short beep. This is normal.
When This Fix Works Best
This method is most effective if:
- The black line on your Dell appeared suddenly.
- The problem started after waking the laptop from sleep.
- The line disappears after restarting.
- You notice occasional screen flickering rather than a permanent line.
If the line remains unchanged, continue with the next troubleshooting step.
Run Dell SupportAssist
Dell SupportAssist is Dell’s official diagnostic and update tool. It scans your system for common hardware and software problems, checks for outdated drivers, and recommends fixes for many laptop display issues.
How to Use Dell SupportAssist
- Open Dell SupportAssist from the Start menu.
- If it isn’t installed, download it from Dell’s official support website.
- Run a full hardware scan.
- Install any recommended driver or firmware updates.
- Restart the laptop.
Using Dell SupportAssist is often the safest way to resolve display issues, as it installs drivers tested specifically for your Dell laptop model. Tip: Always install recommended chipset and graphics updates before attempting hardware repairs.
Install Drivers from Dell Instead of Windows
Windows Update sometimes installs generic graphics drivers. While these usually work, they may not be fully optimized for every Dell laptop display. If the black line on the laptop screen appeared after a Windows Update, installing Dell’s official driver may solve the problem.
How to Install Dell Drivers
- Visit Dell Support.
- Enter your Service Tag or select your laptop model.
- Download the latest graphics driver for your system.
- Install the driver.
- Restart your laptop.
Using Dell-certified drivers reduces compatibility problems and helps fix common display issues more reliably than generic Windows drivers.
Update Intel/NVIDIA Drivers
Many Dell laptops use Intel integrated graphics, while gaming and workstation models include NVIDIA or AMD GPUs. Driver issues can also lead to unusual screen color issues, including warm or yellow-looking displays.
A corrupted or outdated graphics driver may also lead to unusual screen color issues:
- Display flicker
- Warm or yellow-looking displays
- Random black lines
- Resolution problems
- Driver crashes
- Horizontal or vertical lines
Update Using Device Manager
- Right-click Start.
- Open Device Manager.
- Expand Display adapters.
- Right-click your graphics device.
- Select Update driver.
Install the Latest Driver
For the best compatibility:
- Intel users should install Intel graphics drivers recommended by Dell.
- NVIDIA users should install the latest certified NVIDIA driver for their Dell system.
If the issue began immediately after updating the driver, consider rolling back to the previous version.
Adjust Refresh Rate
An incorrect refresh rate can sometimes create screen instability, especially on external displays or high-refresh-rate panels. Although uncommon, it can contribute to horizontal black lines across the display or intermittent flickering.
How to Adjust the Refresh Rate
- Open Settings.
- Select System> Display.
- Click Advanced Display.
- Choose the recommended refresh rate.
After changing the setting, monitor the screen for several minutes. If the line disappears, the previous refresh rate was likely causing the display problem.
Change Screen Resolution
Incorrect Windows display settings can occasionally cause scaling issues or graphical artifacts. Changing the screen resolution ensures Windows uses the panel’s native resolution.
Adjust the Screen Resolution
- Open Settings > Display.
- Locate Display Resolution.
- Select the resolution marked Recommended.
- Apply the changes.
If you recently connected another monitor or changed display settings, this simple adjustment may resolve display problems immediately.
Check the Display Cable
If software fixes do not work, inspect the display cable. The display cable carries video signals from the motherboard to the LCD screen. On many Dell laptops, especially the Dell Inspiron series, this cable passes through the left hinge and bends every time the lid opens. Over time, the cable may become loose or damaged.
Signs of a Faulty Display Cable
- The line changes when opening or closing the lid.
- The display flickers.
- The screen works normally at certain angles.
- The problem becomes worse over time.
If these symptoms match your laptop, the cable should be inspected before replacing the screen. Important: If you have never opened a laptop before, avoid disassembling it yourself. Modern Dell laptops contain delicate connectors that are easy to damage.
Replace the LCD Cable
If inspection confirms the cable is damaged, replacing it is often much cheaper than replacing the display. A new LCD cable can solve problems such as:
- A single vertical line
- Random horizontal line issues
- Intermittent lines appear when moving the lid
- Screen flickering
- Display signal loss
Always purchase the correct cable designed for your exact Dell laptop model. After replacing the cable, test the laptop before reassembling everything completely.
Replace the LCD Panel
If the LCD panel itself is damaged, software fixes will not remove the black line on your Dell laptop screen.
Common signs include:
- Permanent lines across the screen
- Dead pixel columns
- Pressure marks
- Internal cracks
- Ink-like spots
- Physical impact damage
When these symptoms are present, screen replacement is usually the only permanent solution. Choose a genuine Dell LCD or a high-quality compatible replacement to maintain the original display quality.
Motherboard or GPU Repair
If every previous step fails and the external monitor also shows the same problem, the issue may involve the motherboard or graphics processor. This is more common on older gaming laptops and Dell Precision workstations that have experienced years of heavy use.
Possible symptoms include:
- Multiple lines across the screen
- Colored artifacts
- Random freezing
- Crashes during startup
- Displaying a black screen
- Identical display problems on both the laptop and an external monitor
Motherboard and GPU repairs require professional equipment and advanced soldering skills. If your laptop is still covered by warranty, avoid opening it yourself. Instead, contact Dell technical support or an authorized Dell repair center. If the warranty has expired, compare the repair cost with the value of the laptop before proceeding.
What to do next: After completing these fixes, most software-related Dell laptop black line issues should be resolved. If the line remains after passing through every troubleshooting step, the fault is almost certainly hardware-related, and professional diagnosis is the safest next step.
How Screen Line Problems Usually Progress
Display failures often worsen gradually rather than appearing all at once.
| Stage | Typical Symptoms |
|---|---|
| Stage 1 | Thin line appears occasionally |
| Stage 2 | Line appears every boot |
| Stage 3 | Screen flickers |
| Stage 4 | Multiple lines develop |
| Stage 5 | Display becomes unreadable |
If your laptop has reached Stage 3 or beyond, avoid delaying repairs because continued hinge movement may worsen cable damage.
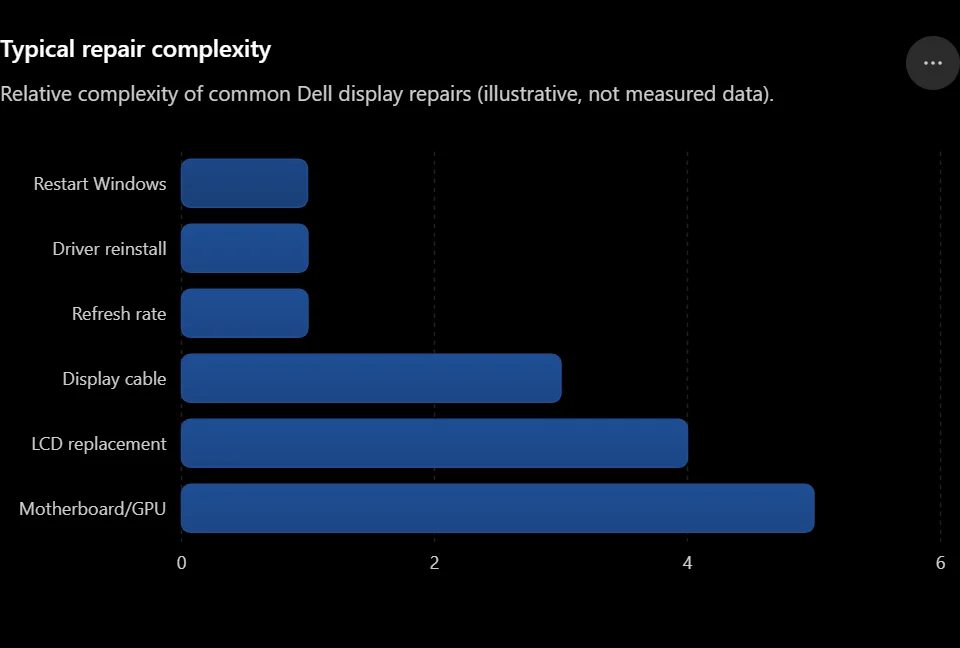
Repair Difficulty Guide
Not every repair requires professional help. Use this table to decide whether you can safely fix the problem yourself.
| Repair | Difficulty | DIY Friendly |
| Restart Windows | Easy | Yes |
| Reset Graphics Driver | Easy | Yes |
| Dell SupportAssist Update | Easy | Yes |
| Graphics Driver Installation | Easy | Yes |
| Refresh Rate Change | Easy | Yes |
| Screen Resolution Change | Easy | Yes |
| Display Cable Inspection | Medium | Only if experienced |
| LCD Cable Replacement | Medium | Experienced users only |
| LCD Panel Replacement | Hard | Usually professional |
| Motherboard or GPU Repair | Expert | No |
If you are unsure about opening your laptop, stop after the software fixes and contact Dell Support.
Dell Warranty: Will Dell Replace the Screen?
Before paying for repairs, check whether your Dell laptop is still covered by warranty. Depending on your Dell warranty plan and the cause of the damage, Dell may repair or replace the display at little or no cost.
Standard Warranty
Dell’s standard limited warranty generally covers manufacturing defects.
Your screen may qualify for warranty service if:
- The LCD panel fails without accidental damage.
- Internal display hardware stops working.
- Factory defects cause common display issues.
However, accidental drops, pressure damage, or liquid spills are usually not covered.
Premium Support
If you purchased Dell Premium Support or Premium Support Plus, you may receive additional benefits, including:
- Faster technical assistance.
- Advanced hardware diagnostics.
- On-site repair in supported regions.
- Priority service for laptop display problems.
Premium plans often reduce repair time compared to standard warranty service.
Accidental Damage Protection
Some Dell laptops include Accidental Damage Protection.
This plan may cover:
- Cracked LCD screens.
- Pressure damage.
- Drop-related screen failures.
- Certain accidental screen problems.
Coverage varies by region and warranty plan, so review your service agreement before requesting repairs.
Check Your Warranty Using the Service Tag
Every Dell laptop has a unique Service Tag.
To check your warranty:
- Locate the Service Tag on the bottom of the laptop or in the BIOS.
- Visit Dell’s official warranty lookup page.
- Enter the Service Tag.
- Review your warranty status and repair options.
Checking your warranty first could save hundreds of dollars on a Dell screen repair.
DIY or Dell Repair Center?
Not every black line on a Dell requires professional repair. Some problems are easy to fix at home, while others require specialized tools and experience.
When DIY Is Appropriate
You can safely try repairing the problem yourself if:
- The line appeared after a Windows Update.
- You suspect a graphics driver issue.
- The BIOS screen looks normal.
- Dell LCD BIST passes without errors.
- You only need to update drivers or adjust Windows display settings.
- You are comfortable replacing an accessible LCD cable.
These fixes involve little risk and often solve software-related display issues.
When to Use Dell Support
Use official Dell support if:
- Your laptop is still under warranty.
- Dell ePSA reports hardware errors.
- The display fails the LCD BIST.
- You are unsure whether the fault is with the LCD or motherboard.
- The laptop develops new power or startup problems alongside the screen issue.
Dell technicians have access to genuine replacement parts and official repair procedures.
When to Visit a Local Repair Shop
A trusted repair shop may be the better choice when:
- Your warranty has expired.
- The LCD panel needs replacement.
- The display cable must be replaced.
- The motherboard requires repair.
- You prefer faster service than warranty processing.
Choose a technician experienced with Dell laptops, especially if motherboard or GPU work is required.
Common Mistakes That Can Make the Problem Worse
Many users accidentally make the issue worse while trying to fix a black line on a Dell laptop screen. Avoid these common mistakes.
- Do not press hard on the screen to make the line disappear.
- Avoid downloading graphics drivers from unofficial websites.
- Do not replace the LCD panel before running Dell LCD BIST.
- Never force the display cable connector into place.
- Avoid opening the laptop while it is still connected to power.
- Do not continue using the laptop if the line spreads rapidly or the display begins flickering heavily.
- If your Dell laptop is still under warranty, avoid opening the chassis because it may affect your warranty coverage.
Taking a few minutes to diagnose the problem properly can prevent unnecessary repairs and reduce the overall repair cost.
Dell Screen Repair Cost
Repair costs vary depending on your laptop model, screen size, and the damaged component. The estimates below reflect common repair prices for most Dell consumer and business laptops.
| Repair Type | Estimated Cost (USD) |
| LCD panel replacement | $80–$250 |
| Display cable replacement | $20–$70 |
| Display connector repair | $50–$120 |
| Motherboard or GPU repair | $180–$500+ |
| Out-of-warranty Dell repair | $150–$400+ |
These prices are estimates and may vary depending on your location and the availability of replacement parts. If the repair cost approaches the value of an older laptop, replacing the device may be a more practical long-term investment.
Can You Continue Using a Dell Laptop with a Black Line?
It depends on what is causing the problem. You can usually continue using your laptop temporarily if:
- The line is thin and does not spread.
- The laptop works normally otherwise.
- An external monitor displays correctly.
- Dell diagnostics report no hardware errors.
Stop using the laptop and arrange repairs if:
- The line becomes longer or wider each day.
- The screen starts flickering frequently.
- The display goes black intermittently.
- Opening or closing the lid makes the problem worse.
- Multiple lines appear across the screen.
Continuing to use a laptop with a damaged display cable can sometimes lead to additional display problems over time.
How to Prevent Black Lines on Dell Laptops
Many Dell laptop display failures develop gradually because of everyday handling habits. A few simple precautions can significantly reduce the risk of future display problems.
Avoid Lifting the Laptop by One Corner
Always lift your laptop with both hands. Picking it up by one corner twists the chassis and places extra stress on the display hinge and LCD cable.
Open the Lid from the Center
Always open the lid from the middle instead of one side. This distributes pressure evenly across the hinge assembly and reduces wear on the cable that connects the screen to the motherboard.
Keep BIOS and Drivers Updated with Dell SupportAssist
Using Dell SupportAssist helps keep your BIOS, chipset, and graphics drivers up to date. Installing official Dell updates improves hardware compatibility and helps resolve display issues before they become serious. Avoid installing unofficial or incompatible graphics drivers whenever possible.
Protect the Hinge During Transport
The hinge area is one of the most vulnerable parts of any laptop. When carrying your laptop:
- Avoid placing heavy objects on top of it.
- Do not overfill your backpack.
- Keep the laptop secure to prevent sudden impacts.
Reducing stress around the hinge can prevent cable damage that often causes lines across the screen.
Use a Padded Laptop Sleeve
A high-quality padded sleeve protects the Dell laptop screen from pressure and accidental impacts during travel.
Even minor pressure can damage an LCD screen, especially when another object is trapped between the keyboard and the display. Protecting your laptop during transport is much easier and less expensive than paying for a screen replacement later.
Final Tip: Most black lines on your Dell laptop problems start with either software conflicts or gradual hardware wear. Running Dell’s built-in diagnostics first, keeping drivers updated with Dell SupportAssist, and handling the laptop carefully can prevent many common display issues before they require costly repairs.
For solutions to flickering screens, dead pixels, and brightness problems, explore our complete troubleshooting hub for laptop and phone display issues.
What We’ve Observed During Dell Screen Troubleshooting
After troubleshooting numerous Dell display issues, one pattern appears repeatedly: many users assume a permanent black line automatically means the LCD panel has failed.
In reality, a surprising number of cases are resolved by identifying a damaged display cable, reinstalling Dell-certified graphics drivers, or confirming the fault with the LCD BIST before replacing expensive components.
For that reason, we always recommend completing Dell’s built-in diagnostics before purchasing replacement parts or booking a repair.
Frequently Asked Questions
Why does my Dell Inspiron have a vertical black line?
A hardware problem rather than Windows usually causes a vertical line on a Dell Inspiron. The most common causes are a worn display cable near the left hinge, a damaged LCD panel, or a loose display connector. Because the cable bends every time you open and close the lid, it can wear out over time.
Start by running the Dell LCD Built-In Self-Test (BIST) and connecting your laptop to an external monitor. These tests will help determine whether the problem is with the display hardware or another component.
Why does the black line disappear when I move the lid?
If the black line on your Dell laptop changes, disappears, or reappears while opening or closing the lid, the display cable is the most likely cause.
The cable that connects the screen to the motherboard passes through the hinge. After years of daily use, it may become loose or damaged.
If the line only changes with lid movement, inspect the display cable before replacing the LCD panel. This is one of the most common display issues seen on older Dell laptops.
Can Dell SupportAssist fix screen lines?
Dell SupportAssist cannot repair a physically damaged LCD screen or broken display cable. However, it can help fix software-related display issues.
It can:
1. Update Dell-certified graphics drivers.
2. Install BIOS and firmware updates.
3. Scan your hardware for common problems.
4. Detect configuration issues affecting the display.
If the black line is caused by outdated drivers or software conflicts, using Dell SupportAssist may resolve the problem without any hardware repair.
How do I run Dell LCD BIST?
Running the Dell LCD Built-In Self-Test (BIST) is simple.
1. Turn off your Dell laptop.
2. Press and hold the D key.
3. While holding D, press the power button.
4. Release both keys when solid color screens appear.
Watch the display carefully.
1. If the black line remains visible during the test, the LCD panel or display hardware is likely faulty.
2. If the line disappears, the problem is more likely related to Windows, graphics drivers, or display settings.
The BIST is one of the fastest ways to distinguish between a software problem and a hardware issue.
Does the Dell warranty cover black screen lines?
It depends on what caused the problem.
Dell’s standard warranty usually covers manufacturing defects, including faulty LCD panels or internal hardware failures.
However, warranty coverage generally does not include:
1. Accidental drops.
2. Pressure damage.
3. Liquid spills.
4. Cracked screens.
Before paying for repairs, use your laptop’s Service Tag to check the current warranty status. If your Dell includes Premium Support or Accidental Damage Protection, your repair options may be broader.
Should I replace the LCD cable or the screen?
Replace the LCD cable if:
1. The line changes when moving the lid.
2. The screen flickers.
3. The problem appears only at certain angles.
4. Dell diagnostics show the LCD panel is working correctly.
Replace the LCD screen if:
1. The line remains visible at all times.
2. The LCD has internal cracks or pressure marks.
3. Dell LCD BIST confirms panel damage.
4. There are permanent horizontal or vertical lines across the display.
Replacing the correct component first can save both time and money.
Why does the line appear only in Windows but not BIOS?
If the BIOS screen looks normal but the black line on your Dell laptop screen appears only after Windows loads, the problem is usually software-related.
Common causes include:
1. Corrupted graphics drivers.
2. Incorrect Windows display settings.
3. Recent Windows Update.
4. Resolution or refresh rate conflicts.
In most cases, updating or reinstalling the graphics driver from Dell’s official support page resolves the issue.
Can a Dell BIOS update cause display lines?
Although uncommon, a BIOS update can occasionally introduce temporary display problems, especially if the update is interrupted or conflicts with an older graphics driver.
If the issue started immediately after updating:
1. Restart the laptop.
2. Install the latest Dell graphics driver.
3. Check for a newer BIOS version if Dell has released one.
4. Run Dell ePSA Diagnostics and Dell LCD BIST to rule out hardware faults.
If all hardware tests pass, the issue is likely software-related rather than a damaged display.
Final Verdict
A black line on a Dell laptop screen does not always mean you need a new display. In many cases, the problem is caused by outdated graphics drivers, incorrect display settings, or a loose display cable that can be fixed without replacing the screen.
The best approach is to troubleshoot the problem step by step instead of guessing. Start with Dell-specific diagnostic tools like Dell LCD Built-In Self-Test (BIST), Dell ePSA Diagnostics, and Dell SupportAssist. Then check the BIOS, connect the laptop to an external monitor, and perform the screenshot test. These simple checks quickly reveal whether you’re dealing with a software issue or a hardware failure.
If your tests point to a software problem, updating Dell-approved graphics drivers, adjusting the screen resolution, or installing the latest BIOS update often resolves the issue. If the problem is limited to the Dell laptop screen, inspect the display cable and LCD panel before considering more expensive repairs.
However, if the black line appears during Dell diagnostics, remains visible in the BIOS, or also appears on an external monitor, the fault is more likely related to the LCD panel, GPU, motherboard, or another internal component. In these cases, professional repair is usually the safest option.
Finally, before spending money on repairs, check your Dell warranty using your Service Tag. If your laptop is still covered, contact Dell Technical Support or an authorized Dell repair center. You may qualify for a repair or screen replacement at little or no cost.
By following the troubleshooting steps in this guide, you can confidently identify the real cause of the problem, avoid unnecessary repairs, and choose the most effective solution for your specific Dell laptop.
Experiencing the same display issue on an HP laptop? Follow our step-by-step HP laptop screen black line troubleshooting guide to diagnose the problem and apply the right fix.