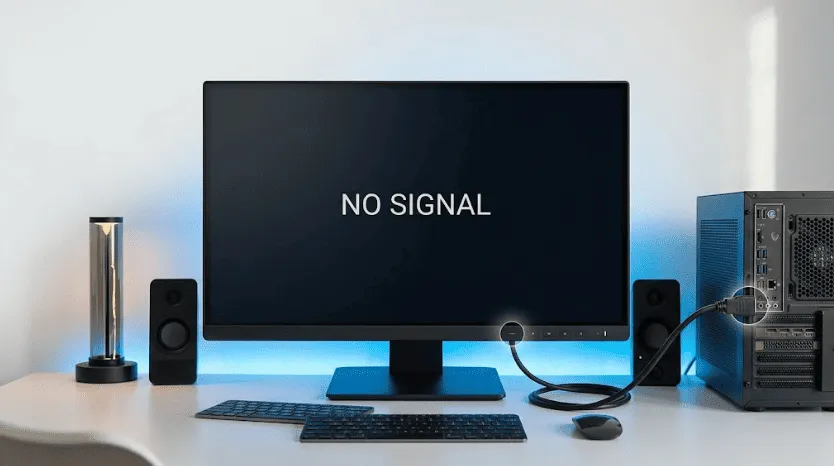
If your monitor says “No Signal” after connecting an HDMI cable, the problem may be simpler than it looks. The cause could be the HDMI cable, input source, port, PC, GPU, Windows settings, or graphics driver.
A powered monitor with no picture is not necessarily a dead monitor. It confirms that the display is receiving power, but it does not prove that every internal component is working correctly. The fastest way to find the cause is to test each part of the connection in order.
This guide walks through that problem step by step. You’ll start with the simplest checks, then move through Windows settings, drivers, and hardware testing. By the end, you’ll know whether the cause is your cable, your port, your PC, your graphics card, or the monitor itself.
The cause can be the input source, the cable, the port, the PC, the GPU, a Windows setting, a driver, an adapter, or the monitor. Most causes are simple. A few need professional help. This guide covers both.
Quick Answer: Why Is My Monitor Not Detecting HDMI?
A monitor usually fails to detect HDMI for a few common reasons. The wrong input may be selected, or the HDMI cable may be loose or faulty. The HDMI port may also be damaged.
On desktop PCs, the cable may be connected to the wrong video output. Windows may also be using the wrong display mode or graphics driver.
Resolution, refresh rate, adapters, docks, GPUs, and monitor hardware can also cause the problem.
Start with the monitor input, HDMI cable, and ports. Then check Windows display settings and the graphics driver.
What Does “HDMI No Signal” Mean?
“No Signal” means the monitor’s screen is working, but it isn’t receiving video data. Two separate things happen when a monitor turns on: power and video signal.
Power turns on the backlight and the internal electronics. The video signal is the picture data sent from your PC through the HDMI cable. A monitor can have power without a signal — that’s exactly why the power light glows while the screen stays black.
HDMI input is the port on the monitor that receives that signal. HDMI output is the port on your PC or laptop that sends it. Several things must work correctly before the picture appears. The cable must carry the signal, the monitor must use the correct input, and the source must support the selected resolution and refresh rate.
The computer and monitor also exchange information about the display’s capabilities. Problems with this communication can sometimes prevent a usable picture.
If any link in that chain breaks, the monitor shows “No Signal,” even if the monitor itself is completely healthy.
Is the Monitor Actually Not Detecting HDMI?
“Not detecting HDMI” can describe several different problems. Identifying your exact symptom can save you from trying unnecessary fixes.
- Monitor says “No Signal.” It’s powered on and set to HDMI, but sees nothing.
- Windows doesn’t detect the monitor. Display Settings shows only one screen, even with the monitor plugged in.
- Monitor is detected but the screen stays black. Windows lists two displays, but the second one shows nothing.
- Monitor works at startup, then disappears in Windows. You see the BIOS logo or boot screen, then lose the picture once Windows loads.
- HDMI works intermittently. The picture flickers, drops, or reconnects on its own.
- HDMI works at 1080p but not at 4K or a high refresh rate. The connection is fine at lower settings only.
Keep your specific symptom in mind as you work through the rest of this guide — it changes which section applies to you.
Before You Start: Identify Your Exact HDMI Problem
| What You See | Most Likely Area |
|---|---|
| Monitor says “No Signal” | Cable, input source, port |
| Windows doesn’t detect the display | Connection, GPU, driver, or display configuration |
| Monitor works in BIOS but not Windows | Driver or display settings |
| Screen is detected but black | Resolution, refresh rate, or HDR |
| HDMI works with another PC | Original computer |
| A different cable fixes it | The original HDMI cable |
| A different monitor works fine | The original monitor |
| HDMI only works after a restart | Driver or power-state issue |
Quick HDMI Troubleshooting Checklist
Run through this 60-second checklist before anything more advanced.
Check These First
- Confirm the monitor is turned on.
- Confirm the correct HDMI input is selected on the monitor.
- Reseat the HDMI cable at both ends.
- Inspect both connectors for damage or debris.
- Try a different HDMI cable.
- Try a different HDMI port on the monitor and the PC.
- Restart both the monitor and the computer.
- Disconnect any docks, hubs, or adapters and connect directly.
- Press Windows + P and check the display mode.
- Test the monitor with another device, or test the PC with another monitor.
If one of these checks fixes the problem, you can stop here. If not, continue with the detailed troubleshooting steps below.
How to Find the Exact Cause of the HDMI Problem
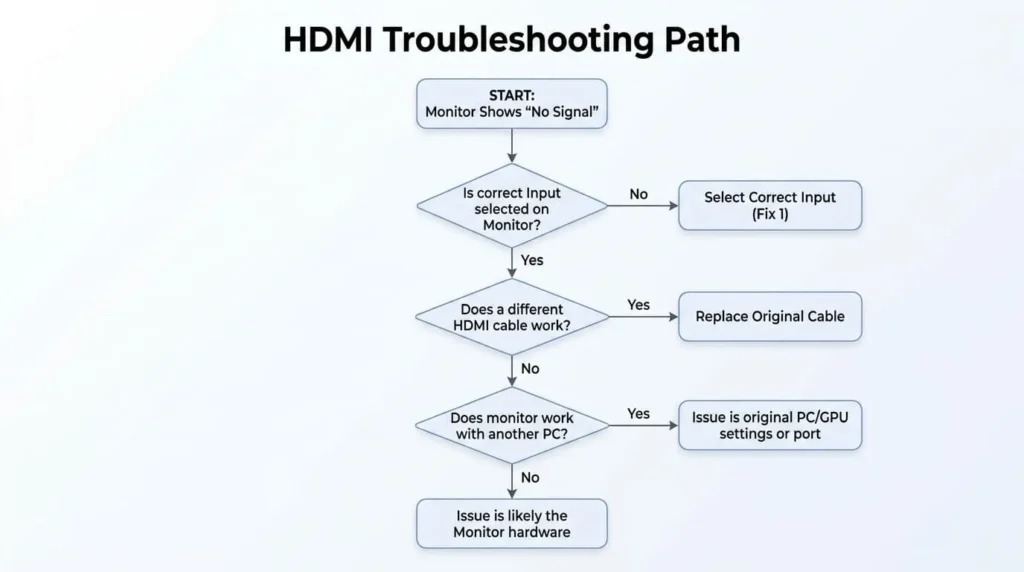
Use this decision tree to narrow things down quickly.
Step 1: Does the monitor power on? No → troubleshoot monitor power, not HDMI. Yes → continue.
Step 2: Does it show “No Signal”? Yes → check the input source, cable, and port (Sections 1–3).
Step 3: Does a different cable work? Yes → replace the cable. No → continue.
Step 4: Does the monitor work with a different computer? Yes → the problem is on the PC or GPU side. No → the problem is likely the monitor or its input.
Step 5: Does a different monitor work with your PC? Yes → the problem is likely the original monitor or cable. No → the problem is likely the PC, GPU, or software.
HDMI Troubleshooting Results — What Each Test Means
| Test | Result | What It Means |
|---|---|---|
| Different HDMI cable | Works | Original cable was likely faulty |
| Different monitor | Works | Original monitor or its input is suspect |
| Different PC | Works | Original PC is suspect |
| Different GPU port | Works | Original port may be faulty |
| Direct connection (no dock/adapter) | Works | Adapter or dock is the problem |
| BIOS shows a picture | Yes | A software or driver issue is more likely than hardware |
| Windows detects the monitor | Yes | The connection is being recognized |
| 1080p works but 4K fails | Yes | A bandwidth or compatibility limit is likely |
How to Fix a Monitor Not Detecting HDMI
Start with the simplest checks first, then work your way through Windows settings, drivers, and hardware tests. These fixes will help you find why your monitor is not detecting HDMI and get your display working again.
1. Select the Correct HDMI Input on Your Monitor
This is an easy fix that many users overlook, and it should be one of the first things you try.
Many monitors have more than one video input: HDMI 1, HDMI 2, DisplayPort, and sometimes VGA or USB-C. If the monitor is set to look at HDMI 2 while your cable is plugged into HDMI 1, it will show “No Signal” even though everything is connected correctly.
Some monitors have automatic input detection and switch on their own. Many do not, especially budget models. That means the cable can be perfectly connected while the monitor is simply “looking” at the wrong port.
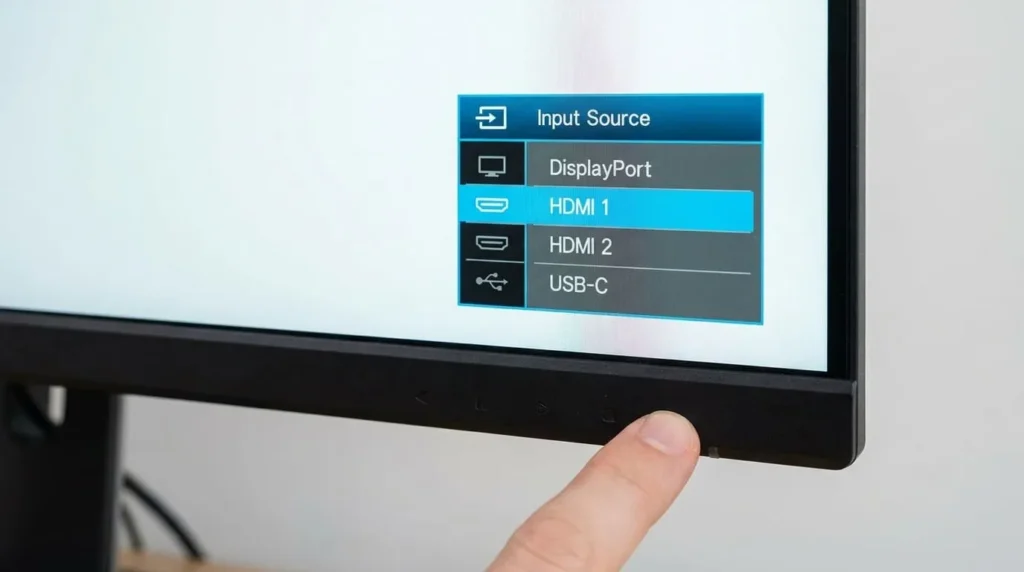
How to Change the Monitor Input Source
- Find the Source, Input, or Menu button on the monitor (front or bottom edge).
- Press it to open the on-screen display (OSD).
- Navigate to Input Source or Signal Source.
- Select the HDMI port your cable is actually connected to.
- Wait a few seconds for the picture to appear.
What If the Monitor Has Multiple HDMI Ports?
Test HDMI 1 and HDMI 2 separately. Plug your cable into HDMI 1, select HDMI 1 in the OSD, and check for a picture. Then repeat with HDMI 2. If one port works and the other doesn’t, the failing HDMI port itself may be the problem, not your cable or PC.
2. Check and Reseat the HDMI Cable
A cable that looks connected isn’t always fully seated. Common issues include:
- A loose or partially inserted connector
- A damaged connector shell
- Bent or corroded contacts inside the plug
- A frayed, crushed, or kinked cable
- Physical strain pulling the plug sideways
- Dust or debris inside the port
How to Test an HDMI Cable
The simplest test is substitution: connect a known-good HDMI cable and see if the picture appears. Replacing the cable isn’t just a fix — it’s also a diagnostic test. If a different cable works immediately, the original cable was the problem.
Can a Bad HDMI Cable Cause “No Signal”?
Yes. A faulty or damaged HDMI cable can prevent the monitor from receiving a usable signal. It is the most common cause of a “No Signal” message. Even a cable that looks fine on the outside can have broken wires inside, especially after being bent, pinched, or stepped on repeatedly.
3. Make Sure HDMI Is Connected to the Correct PC Port
This deserves its own section because it trips up a huge number of desktop users, especially after a new graphics card is installed.
HDMI Port on the Graphics Card vs. Motherboard
Most desktop PCs with a dedicated graphics card have two sets of video ports: one built into the motherboard, and one on the graphics card itself. They look similar, but they aren’t interchangeable.
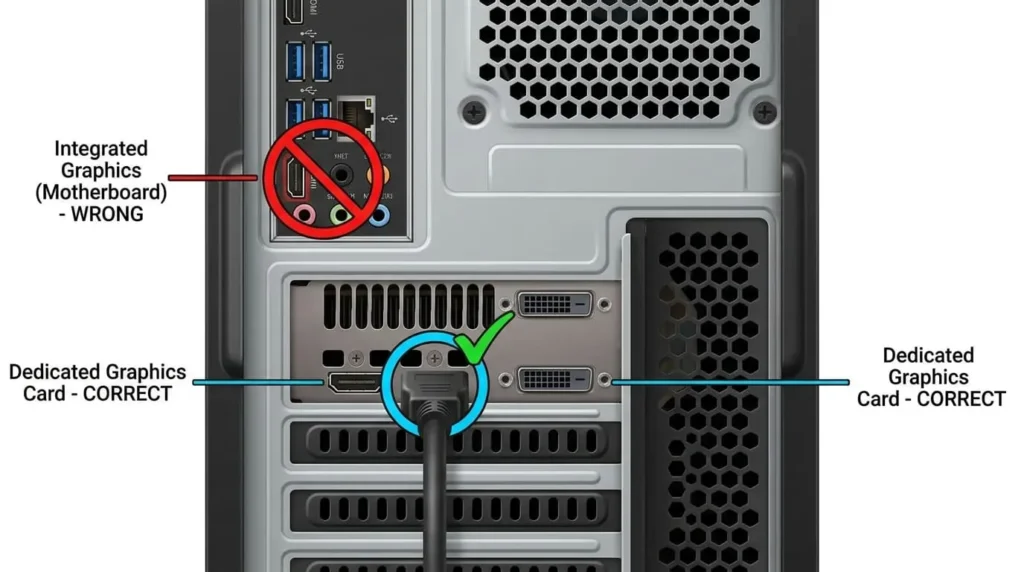
The motherboard’s HDMI port is connected to the CPU’s integrated graphics when supported. The graphics card’s HDMI port is connected directly to the dedicated GPU.
On many desktop PCs with a dedicated graphics card, you should connect the monitor directly to the GPU. Some systems can use integrated and dedicated graphics at the same time, depending on the hardware and settings.
Where Should You Plug HDMI on a Desktop With a Dedicated GPU?
On some PCs, installing a dedicated graphics card changes how the motherboard’s video outputs work. The exact behavior depends on the CPU, motherboard, BIOS settings, and system configuration. If your HDMI cable is plugged into the motherboard port instead of the graphics card, the monitor gets no signal at all — even though the PC is running normally.
Look at the back of the case. The graphics card is usually the larger card lower down, often near an expansion slot bracket, while the motherboard’s own ports sit higher up, grouped with USB and audio jacks. Move the HDMI cable to the graphics card’s port and try again.
If you’re not sure which port belongs to which, check your PC manufacturer’s documentation or look up your motherboard and GPU model online — the physical layout varies by system.
4. Disconnect Docks, Hubs, Adapters, and HDMI Switches
Anything sitting between your PC and monitor can introduce a point of failure:
- USB-C hubs and multiport adapters
- Docking stations
- HDMI-to-HDMI adapters or extension cables
- HDMI splitters
- KVM switches
- AV receivers or soundbars in the signal path
Connect the Monitor Directly to the Computer
Bypass every accessory and connect the HDMI cable straight from the PC or laptop to the monitor. If the picture appears immediately, the problem is in the dock, hub, adapter, or switch — not the monitor or the PC.
Why USB-C to HDMI May Not Work
USB-C is a connector shape, not a guarantee of video output. Some USB-C ports carry data and charging only. To send video, the port must support DisplayPort Alt Mode, Thunderbolt, or USB4. A USB-C to HDMI adapter cannot provide video if the USB-C port does not support video output. Check the device specifications for DisplayPort Alt Mode, Thunderbolt, USB4, or another supported display feature. No matter how good the adapter is.
5. Restart Both the Monitor and Computer
A simple restart clears many temporary display glitches, especially after sleep, a driver crash, or a Windows update.
Perform a Full Power Cycle
- Shut down the computer completely.
- Turn off the monitor using its power button.
- Unplug the monitor’s power cable.
- Wait about 30 seconds.
- Plug the monitor back in and turn it on.
- Start the computer.
A full power cycle can clear temporary power or connection states that may prevent the display from working correctly. Not just their software. This clears temporary handshake failures that a simple restart alone sometimes misses.
6. Press Windows + P and Change Display Mode
Windows has a built-in shortcut for choosing how it handles multiple screens.
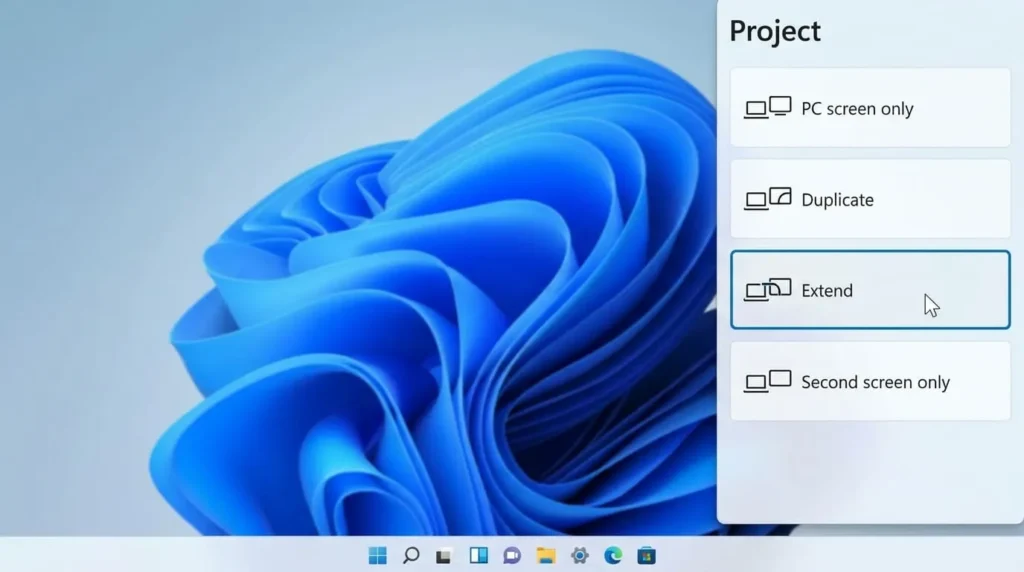
Press Windows + P to open the display mode menu:
- PC screen only — disables the external monitor entirely
- Duplicate — mirrors the same image on both screens
- Extend — spreads your desktop across both screens
- Second screen only — sends the picture only to the external monitor
Which Windows Display Mode Should You Use?
For a second monitor, Extend is usually what you want. If the mode is accidentally set to “PC screen only,” the external monitor will show nothing, even though it’s connected correctly and fully working.
7. Force Windows to Detect the HDMI Monitor
If Windows still doesn’t see the monitor, you can manually trigger detection.
- Right-click the desktop and select Display settings.
- Scroll down to Multiple displays.
- Click Detect.
This tells Windows to re-scan every video output for a connected display, rather than waiting for automatic detection.
What If Windows Says “No Other Display Detected”?
This means Windows checked every video output and found nothing responding — not that the monitor is broken. If Windows still cannot find the display, return to the cable, input, and port checks. Then continue with the graphics driver and display settings.
8. Reset the Graphics Driver
Windows has a dedicated shortcut for resetting the display driver without a full reinstall:
Windows + Ctrl + Shift + B
When you press it, the screen will briefly go black and you may hear a beep. This tells Windows to restart the graphics driver in place. It’s a safe first step for a setup that was working fine and suddenly stopped, and it’s far quicker than uninstalling drivers.
Use this shortcut when:
- HDMI worked recently and stopped without any hardware changes
- The screen froze or the driver appears to have crashed
- You want a quick reset before trying anything more involved
9. Update, Roll Back, or Reinstall the Graphics Driver
Update the Graphics Driver
Outdated drivers can cause detection failures, especially after connecting a new monitor or after a Windows update. Update through Device Manager, or use the manufacturer’s own tool — NVIDIA App, AMD Software, or Intel Graphics Software — for the most current version.
- Right-click Start and open Device Manager.
- Expand Display adapters.
- Right-click your graphics card and choose Update driver.
- Select Search automatically for drivers.
Roll Back the Driver
If HDMI worked fine before a driver update, and stopped immediately afterward, roll back instead of updating further.
- Open Device Manager > Display adapters.
- Right-click your graphics card and choose Properties.
- Go to the Driver tab.
- Select Roll Back Driver (only available if a previous version was installed).
Reinstall the Graphics Driver
If updating and rolling back don’t help, a clean reinstall can clear a corrupted driver.
- In Device Manager, right-click the graphics card.
- Choose Uninstall device and follow the prompts. Restart the PC afterward.
- If the problem continues, install the latest graphics driver from NVIDIA, AMD, Intel, or your computer manufacturer’s support page.
- Restart the PC, Windows will reinstall a basic driver automatically.
- Install the latest driver from NVIDIA, AMD, or Intel afterward.
10. Check Windows Display Resolution and Refresh Rate
This matters most for 4K monitors and high-refresh gaming displays.
Unsupported resolutions and refresh rates can prevent a picture from appearing at all, particularly over older HDMI cables or older HDMI versions that don’t have enough bandwidth for 4K at high refresh rates.
Try 1920 × 1080 at 60 Hz
This isn’t a permanent fix — it’s a diagnostic test. If a lower resolution and refresh rate work, the connection itself is fine, and the problem is bandwidth or compatibility at the higher setting.
- Open Settings > System > Display.
- Set resolution to 1920 × 1080.
- Set refresh rate to 60 Hz.
- Check if the picture returns.
What If 1080p Works but 4K Does Not?
This points toward one of these:
- The cable may not support the bandwidth required by your resolution and refresh rate.
- The HDMI version on your GPU or monitor is older (HDMI 1.4 vs. 2.0/2.1)
- An adapter or dock in the chain is limiting bandwidth
- The monitor’s 4K input has a compatibility issue with your specific GPU
11. Check Whether Windows Detects the Monitor
There’s a difference between “not detected” and “detected but no picture.” Device Manager tells you which one you have.
- Open Settings > System > Display — is the monitor listed, even grayed out?
- Open Device Manager > Monitors — is there an entry for your display?
- Open Device Manager > Display adapters — is your graphics card listed with no warning icon?
What Does “Generic PnP Monitor” Mean?
This is normal, not necessarily an error. It’s the label Windows uses when it can read a monitor’s basic identification data but hasn’t installed a model-specific profile. It only becomes a real problem if the monitor is missing entirely, shows a yellow warning icon, or is stuck at the wrong resolution.
What If the GPU Has a Warning Icon?
A yellow exclamation mark on the graphics card in Device Manager usually means the driver has failed to load or is corrupted. This is a strong signal to go back to Section 9 and update, roll back, or reinstall the driver.
12. Test Another HDMI Port
Testing both ends separately narrows down where the fault sits.
Try Another HDMI Port on the Monitor
If the monitor has more than one HDMI input, move the cable to the other one and select it in the OSD. If the second port works, the first port on the monitor is likely damaged.
Try Another HDMI Output on the PC or GPU
If your graphics card has more than one HDMI or DisplayPort output, try a different one. If a different port on the PC works, the original PC-side port is the likely fault.
13. Test the Monitor With Another Computer
This is one of the most useful isolation tests in the entire troubleshooting process.
Connect the monitor to a laptop, another desktop, or even a game console using the same or a known-good cable. If the monitor works fine on another device, the monitor itself is probably not the problem, the fault sits with your original PC, GPU, cable, or port.
14. Test the Computer With Another Monitor or TV
Run the reverse test using the same PC and, ideally, the same HDMI cable, but a different display.
What the Test Results Tell You
| Test Result | Likely Problem |
|---|---|
| Monitor fails on every device tested | The monitor |
| PC fails with multiple different displays | The PC or GPU |
| A new cable fixes it | The original cable |
| A different GPU port works | The original port |
| Direct HDMI connection works | An adapter or dock |
| BIOS shows a picture, Windows doesn’t | Driver or display settings |
15. Check the HDMI Port for Physical Damage
Inspect both ends of the connection closely:
- Bent or pushed-in pins
- Cracked or loose port housing
- A port that wobbles or doesn’t grip the cable
- Dust, lint, or debris blocking the connector
- A cable that won’t seat all the way, even when aligned correctly
Signs Your HDMI Port May Be Damaged
Watch for a signal that comes and goes when you gently wiggle the cable, a connector that feels loose compared to other ports, or a picture that only appears when the cable is held at a specific angle. Any of these point toward physical port damage rather than a software issue.
Note that physical pressure or impact that damages ports can sometimes damage the panel itself. If you notice visual artifacts like a black line appearing on your screen after struggling with a tight connection or dropping the device, the hardware damage has unfortunately extended beyond the port.
Fix Specific HDMI Problems
Not every HDMI problem has the same cause. These targeted fixes cover common situations, such as HDMI working in BIOS, losing signal after sleep, or failing on a second monitor.
1. What If HDMI Works in BIOS but Not in Windows?
This is one of the most useful diagnostic clues you can get. Seeing a picture in BIOS or the boot screen provides strong evidence that the basic display connection is working. If the display disappears when Windows loads, a Windows, driver, or display-configuration problem becomes more likely. If the display disappears when Windows loads, a Windows, driver, or display-configuration problem becomes more likely:
- The graphics driver
- The Windows display configuration or mode
- The chosen resolution or refresh rate
- HDR settings
- A conflict introduced by another app or a recent update
Since the hardware chain is already confirmed to work, focus your effort on Sections 6 through 10 rather than testing cables and ports again.
2. What If the Monitor Works Sometimes but Loses Signal?
An intermittent connection usually points to one of these:
- A loose or slightly worn cable connection
- A partially damaged cable
- A worn HDMI port
- A graphics driver that occasionally crashes
- A power-saving or sleep setting interrupting the display
- A high-bandwidth resolution or refresh rate near the edge of what the cable supports
- An unreliable adapter or dock
Why Does HDMI Keep Disconnecting?
Repeated disconnects can result from a loose connection, faulty cable, worn port, driver problem, power-management issue, or bandwidth limitation. A cable, connector, or port that isn’t making solid contact — rather than a software bug. Start by swapping the cable and testing a different port before touching drivers or settings.
3. Fix HDMI Problems After Sleep or Restart
If HDMI works at boot but is gone after sleep, or returns only after a full reboot, this points to how Windows and the GPU handle waking the display back up.
Try these in order:
- Update the graphics driver to the latest version.
- Reset the driver with Windows + Ctrl + Shift + B immediately after waking the PC.
- Adjust power settings so the GPU and USB controllers don’t power down aggressively during sleep.
- If a dock is involved, connect directly to rule it out as the cause.
4. Fix HDMI Problems After a Windows Update
If HDMI stopped working immediately after a Windows update, a driver or display-configuration change may be involved. If HDMI stopped working right after an update:
- Check for a newer graphics driver from NVIDIA, AMD, or Intel — updates sometimes need a matching driver refresh.
- If no newer driver exists, roll back to the previous driver version.
- Restart fully rather than just signing out.
- Recheck the display mode with Windows + P, since some updates reset it.
Not every HDMI issue after an update is actually caused by the update itself — always confirm the cable and port first, since a coincidental hardware issue is easy to mistake for an update-related one.
5. Laptop Not Detecting External Monitor Through HDMI
Laptops introduce a few extra variables worth checking specifically.
- Confirm the laptop’s HDMI output is working by testing another monitor or TV.
- Press Windows + P and confirm Extend or Duplicate is selected.
- Confirm the external monitor is on the correct HDMI input.
- Test with a different HDMI cable.
- Update the laptop’s graphics driver.
- If you’re using a USB-C adapter instead of a built-in HDMI port, confirm the laptop’s USB-C port actually supports video output.
- If a docking station is involved, connect the monitor directly to the laptop to rule the dock out.
Manufacturer support guidance for external displays consistently recommends disconnecting other accessories, checking the cable, testing with another system, and using the built-in Windows display controls as the core troubleshooting path for laptops, the same order used throughout this guide. If you have ruled out the HDMI connection but your built-in display is also acting up alongside the external monitor issues, check our guide on common laptop screen problems and how to fix them for targeted hardware troubleshooting.
6. Second Monitor Not Detected Through HDMI
For a second monitor specifically, check:
- Windows Display Settings shows both screens, even if one is grayed out
- The display mode is set to Extend, not “PC screen only”
- Your GPU actually supports the number of displays you’re trying to run
- A dock isn’t limiting how many displays it can output at once
A note on HDMI splitters: an HDMI splitter duplicates one signal to two screens — it does not create two independent, extended displays. If you’re trying to run two different desktops on two monitors, a basic splitter is the wrong tool. For independent extended displays, you need hardware that supports multiple display outputs. Depending on your computer, this may be a graphics card, compatible dock, or supported USB display adapter.
7. USB-C to HDMI Adapter Not Detecting Monitor
USB-C to HDMI failures usually trace back to one of these:
- The USB-C port doesn’t support DisplayPort Alt Mode, Thunderbolt, or USB4 video output, it’s data and charging only
- The adapter itself is faulty or low quality
- Insufficient power delivery to the adapter
- A docking station limiting available video outputs
- A cable that can’t handle the required bandwidth
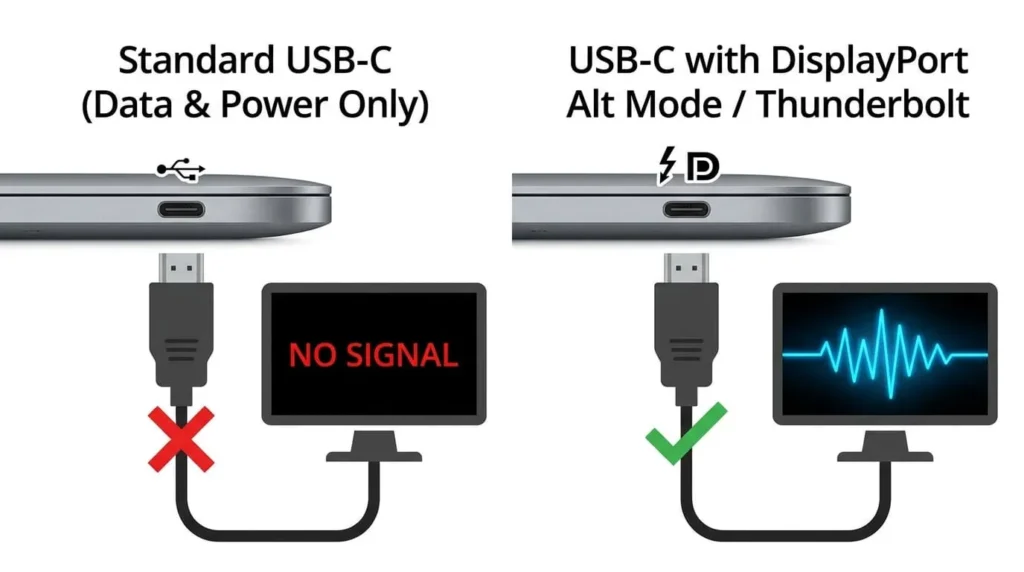
Check your device’s exact specification sheet for terms like “DisplayPort over USB-C,” “Thunderbolt,” “USB4,” or “video output support.” If the port doesn’t list one of these, no adapter will make it output video, because there’s no video signal for it to convert in the first place.
8. Monitor Detected but Screen Is Black
This is a different problem from “not detected at all,” and it deserves separate treatment.
If Windows lists the monitor but the screen stays black, check:
- Resolution and refresh rate — an unsupported setting can produce a black screen even with an active connection
- HDR — some monitors show a black or flickering screen with HDR enabled at certain resolutions
- Display mode — confirm it’s not set to “PC screen only”
- Graphics driver — a crashed driver can leave a detected display with no output
- Brightness — check the monitor’s own brightness setting isn’t turned all the way down
- Input source — double-check it still matches the connected port
- Cable bandwidth — a marginal cable can pass enough data for detection but not enough for a stable picture
Once you resolve the bandwidth or driver issue and get the picture back, it’s highly recommended to test your screen for dead pixels and other display defects using our free online tool to ensure the prolonged black screen wasn’t masking panel degradation or stuck pixels.
Advanced HDMI Troubleshooting
Try these only if the steps above haven’t resolved the issue.
Reinstall Display Drivers
A full driver reinstall clears corrupted files that a simple update sometimes leaves behind. See Section 9 for the exact steps.
Roll Back Display Drivers
Especially useful when the issue started right after a driver update. See Section 9.
Check BIOS/UEFI Display Settings
Some systems let you choose a primary video output (integrated vs. dedicated graphics) in BIOS. If this is set incorrectly, Windows may never see the monitor on the port you’re using.
Check GPU Configuration
Confirm the correct graphics card is set as the active display adapter, especially on laptops with both integrated and dedicated graphics.
Update Monitor Firmware
Some monitor manufacturers release firmware updates that fix HDMI handshake and detection bugs. Check your monitor manufacturer’s support page for your exact model.
Reset Monitor Settings
Most monitors have a factory reset option in the OSD menu. This clears any misconfigured settings that may be blocking detection.
Check Manufacturer-Specific Display Settings
NVIDIA, AMD, and Intel each have their own control panels with display-related options. Confirm the monitor is enabled and not disabled or hidden in these tools.
A word of caution: BIOS and firmware changes carry more risk than the fixes earlier in this guide. Only change settings you understand, and avoid interrupting a firmware update once it starts.
When Should You Replace the HDMI Cable?
Replace the cable when:
- You can see visible damage — fraying, kinks, or a loose connector
- The signal is intermittent, even after reseating the cable
- A known-good cable fixes the problem immediately
- You’re running a high-bandwidth setup (4K at 60Hz+ or high refresh rate) and your current cable is old or unrated for it
- You’re using a long cable run and losing signal quality
There’s no need to buy an expensive cable “just in case.” If a basic replacement cable solves the issue, that confirms the diagnosis without extra spending.
When Is the Monitor Probably Faulty?
The monitor becomes the likely cause when:
- It fails with more than one known-good HDMI cable
- It fails when connected to more than one source device
- Its HDMI input fails consistently, while other inputs (DisplayPort, VGA) work fine
- The HDMI port itself shows visible physical damage
When Is the Graphics Card or PC Probably Faulty?
The PC or GPU becomes the likely cause when:
- Multiple different monitors fail to display anything
- Multiple known-good cables fail to fix the issue
- More than one output port on the GPU fails
- The GPU is missing from Device Manager or shows a persistent error
- The same monitor works fine when connected to another computer
- Driver problems keep returning even after a clean reinstall
When Should You Contact Technical Support?
Stop DIY troubleshooting and reach out for professional help if you notice:
- Physical damage to the HDMI port on the motherboard or graphics card
- Signs the GPU itself may have failed (no display on any port, with another monitor confirmed working)
- Monitor hardware failure after ruling out cable, port, and source
- Your device is still under warranty — opening it yourself can void coverage
- A burning smell, unusual heat, or any sign of electrical damage
- The same hardware failure keeps recurring after a proper fix
Summary
A monitor that is not detecting HDMI does not always mean the monitor is faulty. The problem can come from the HDMI cable, input source, port, graphics card, Windows settings, drivers, or an adapter.
Start with the basics. Select the correct HDMI input and reseat the cable. Then test another cable or port. If you use a desktop with a dedicated GPU, make sure HDMI is connected to the graphics card.
If the hardware checks pass, review Windows display settings and reset the graphics driver. You can also test the monitor with another computer to isolate the faulty component.
By following these steps in order, you can identify the cause of most HDMI no-signal problems without replacing hardware unnecessarily.